Paid Search
How to Advertise on Google, Bing, Yahoo & More
If the niche you’re in is too competitive to rank near the top of Google, Bing, and other search engines organically, it might be worth it to advertise on those search engines (pay to be there essentially). And you can be a local service or an e-commerce site that services the whole country- you can both use this method. However, in recent years, it has gotten really expensive. That’s because it’s an auction system. The more time goes by, the more businesses sign up for Google Ads and want to get found for the same keywords that you do, the higher the cost-per-click gets for each keyword. There was a time when Google Ads was great (back when it was called Google Adwords). I’ve built businesses on the platform! But sadly, those days are over. If you’re in a business that makes money, you’re likely gonna have competition and that has priced out all the keywords. That’s why I personally focus more on organic SEO or advertise by other methods these days.
That being said though, maybe you’re lucky and you’re in a business that still has affordable keywords. If that’s the case, I will now show you how to set up Google Ads and Bing/Microsoft paid search campaigns.
Setting Up a Search Campaign in Google Ads
First, sign into Google Ads at:
with your Google account. If this is your first time setting up a Google Ads account, it will not bring you to the normal dashboard screen. It will run a watered-down version of Google Ads which we don’t want. The easy version gives Google the reigns and they will spend your money as they please. But we want control so we are going to want the normal dashboard. So to get past the easy, watered-down version, click on “Switch to expert mode” as you as you see it. It will be towards the bottom of the screen at some point during the onboarding process (probably after you enter in your business name and your website’s URL).
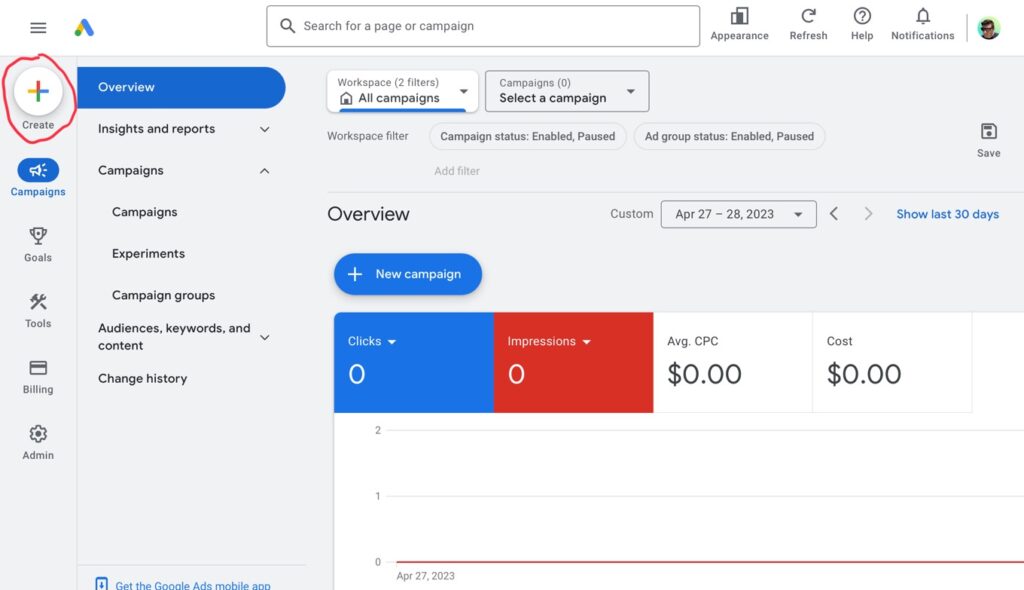
When you’ve finally made it to the regular Google Ads dashboard, click on “Create” to start setting up your campaign (or if it’s your first time setting up the account, it may begin the campaign setup automatically). Either way, the “Create” button will always do it…
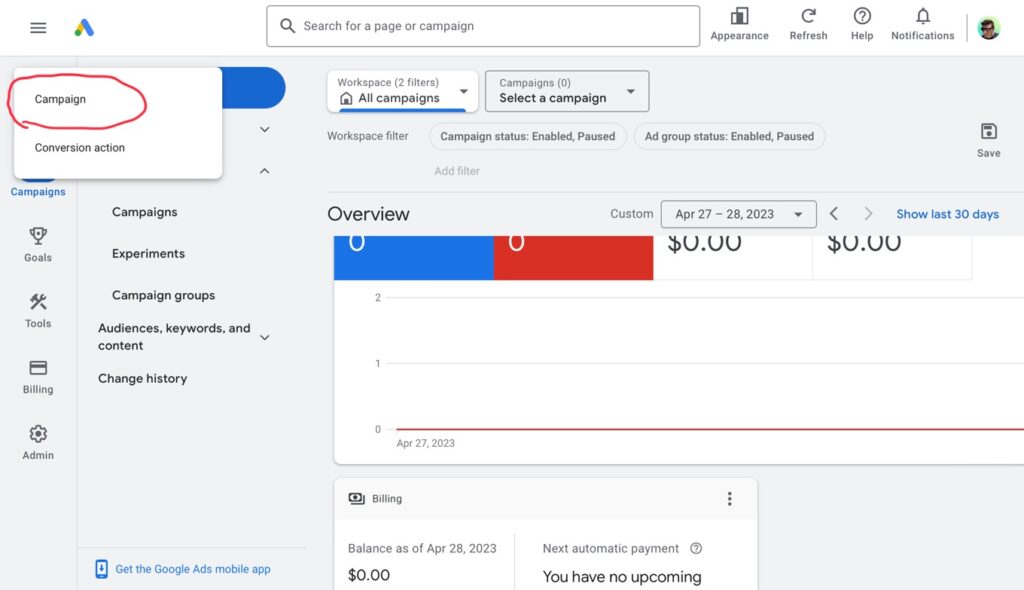
Then click “Campaign”…
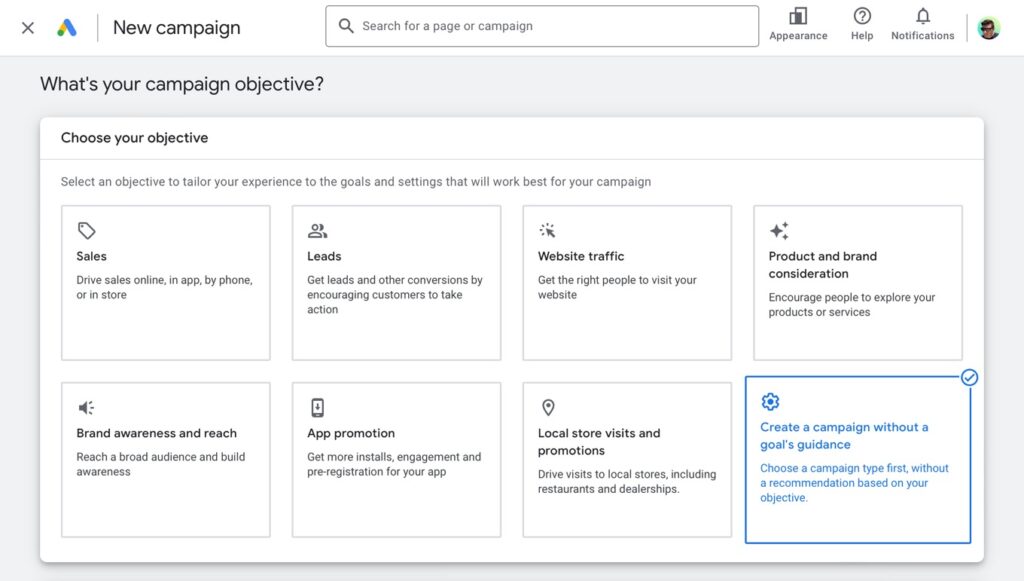
Next, it will ask what your campaign objective is. Select “Create a campaign without a goal’s guidance”. That way, all features will remain unlocked. The other options just turn features off to tailor them to your objective. However, I like to keep all features open because you never know what changes you might make to the campaign in the future…
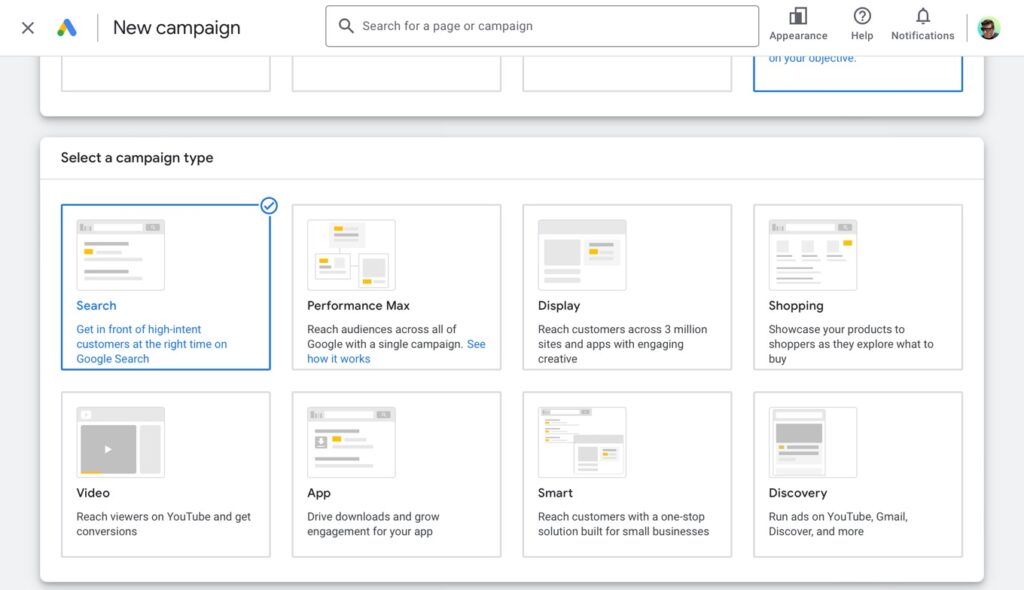
Immediately after that, under “Select a campaign type”, select “Search”…
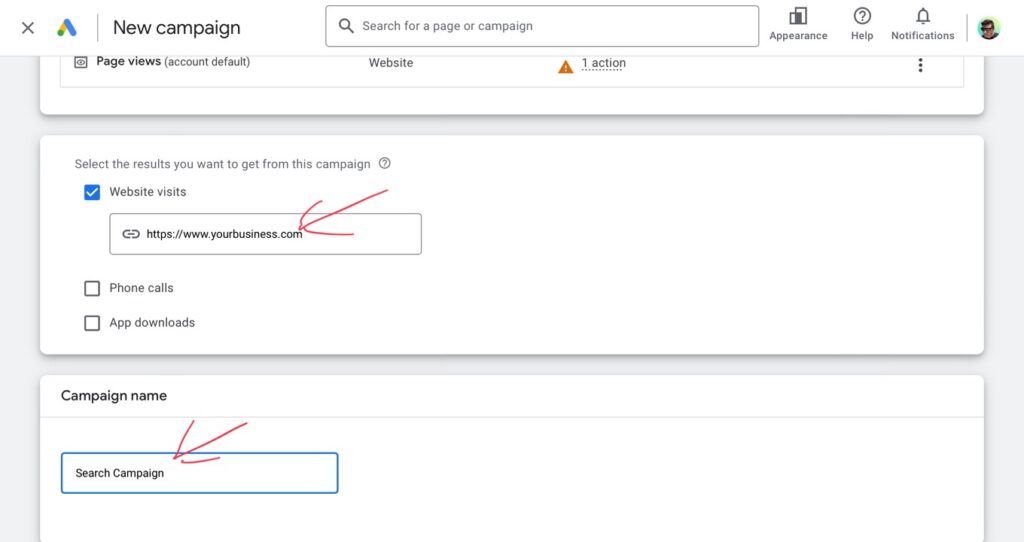
Next, I’m going to check “Website visits” and enter in my website URL (because my business has a website and this is… well… digital marketing). Then, underneath “Campaign name” I usually just put “Search Campaign”. And that is just because later on I might have a display campaign, a video campaign for YouTube, and a remarketing campaign too. So that way, I know what’s what…
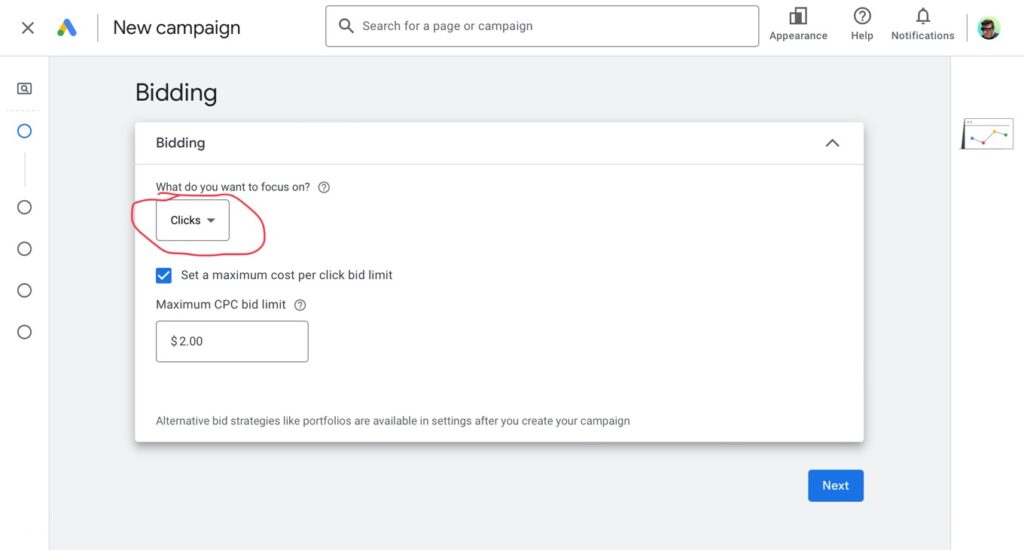
In the next screen, change the drop-down options from “Conversions” to “Clicks” (just because we’re doing a basic setup for this demonstration- you can explore other ways to bid later). Then check the “Set a maximum cost per click” box and enter a nice low number. I’m just putting $2 for now (to keep spending down until I know more later). It can always be changed later…
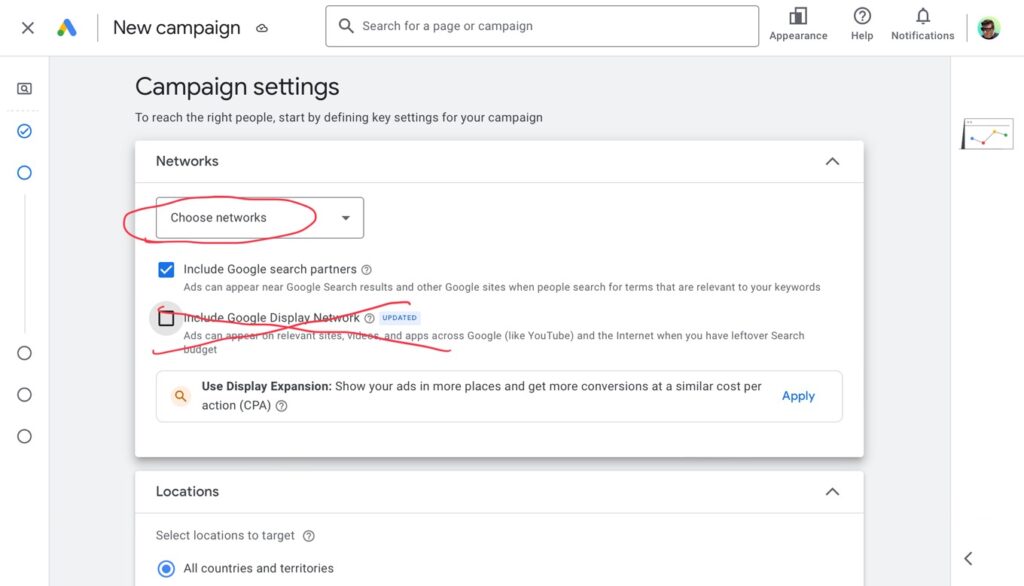
We are now in the “Campaign settings” portion. Underneath “Networks”, change the drop-down options to “Choose networks”. Again, we want control and not let Google spend our money carelessly. Now uncheck “Include Google Display Network”. We are not running display ads. That’s an entirely different concept. If we want to run display ads, we’ll set that up separately. Right now, we’re setting up a search campaign. You can keep “Include Google search partners” checked though. Those are more search engines so that’s good…
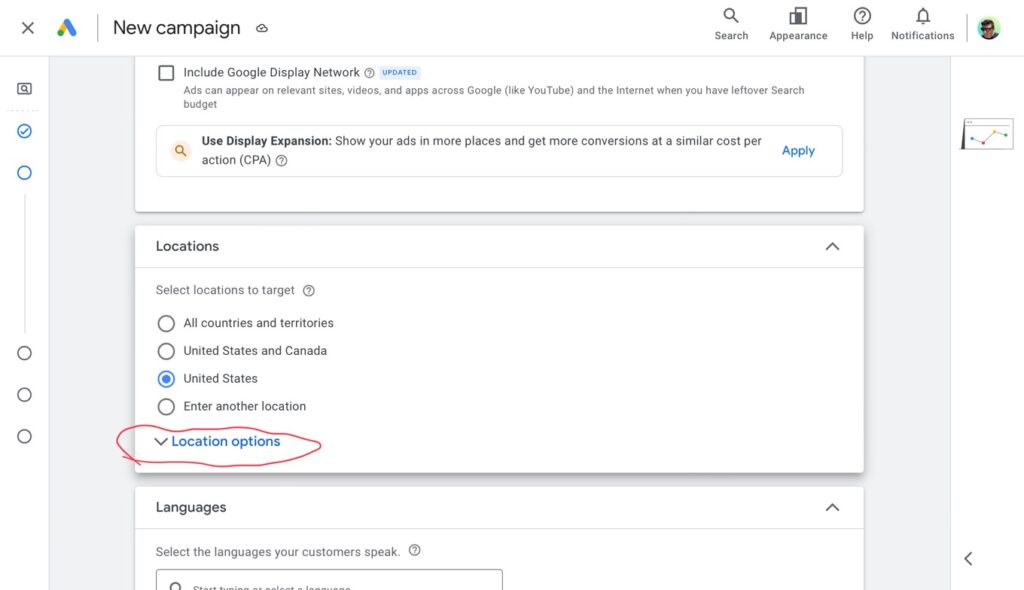
Scrolling down to “Locations”, I will now choose where I want my ads to appear geographically. I can choose countries, states, counties, cities, even dial down to zip codes (which has been useful for clients that service only a section of the outskirts of a major city). When targeting a major city, you can just target the city’s DMA (which means: the city plus the smaller surrounding cities- the whole metro area). To enter locations such as those, select “Enter another location”. Since the business I’m advertising serves the entire United States, I’m going to select “United States” and then click on “Location options”…
It’s very important to click on “Location options” and open that drop-down. Most people skip it but if you skip, you will overspend. You need to change the selection there to “Presence: People in or regularly in your targeted locations”. If you leave it on “Presence or interest” (as Google recommends) then you will waste money on people who aren’t even in your location. The only industry that I can think that would be useful for is tourism. If you’re advertising a hotel, then your customers will search from locations outside of your own, of course. But for most cases, you want to make sure your ads only show to users that are actually inside the locations you choose…
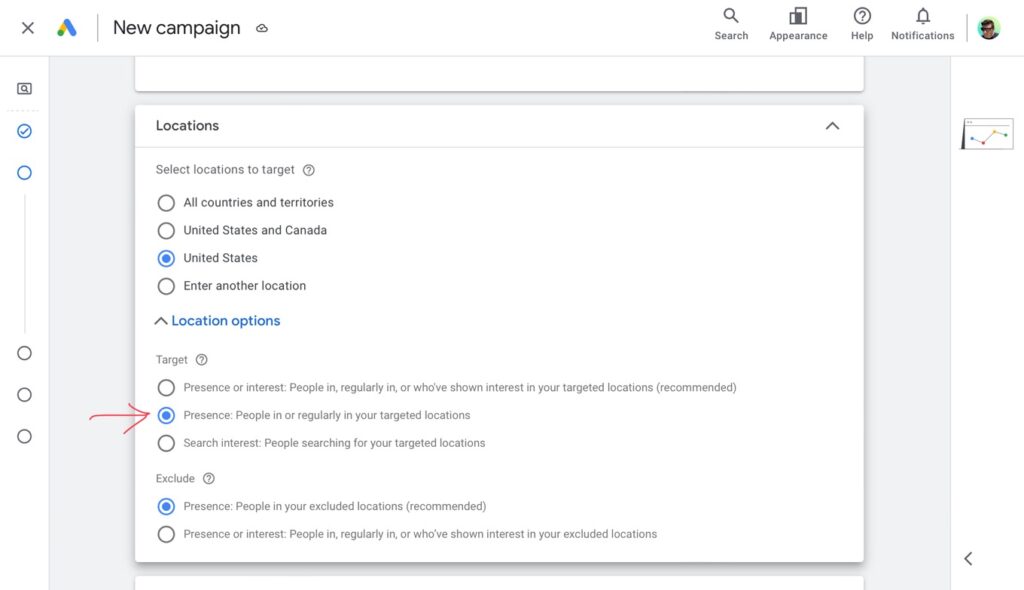
Underneath “Exclude”, you can leave that on “Presence” (as Google recommends). By the way, “Exclude” refers to locations you may want to omit from the campaign. But since you’re selecting individual locations (with “Presence” target), there’s need to exclude any locations (as you won’t show in any other locations anyway).
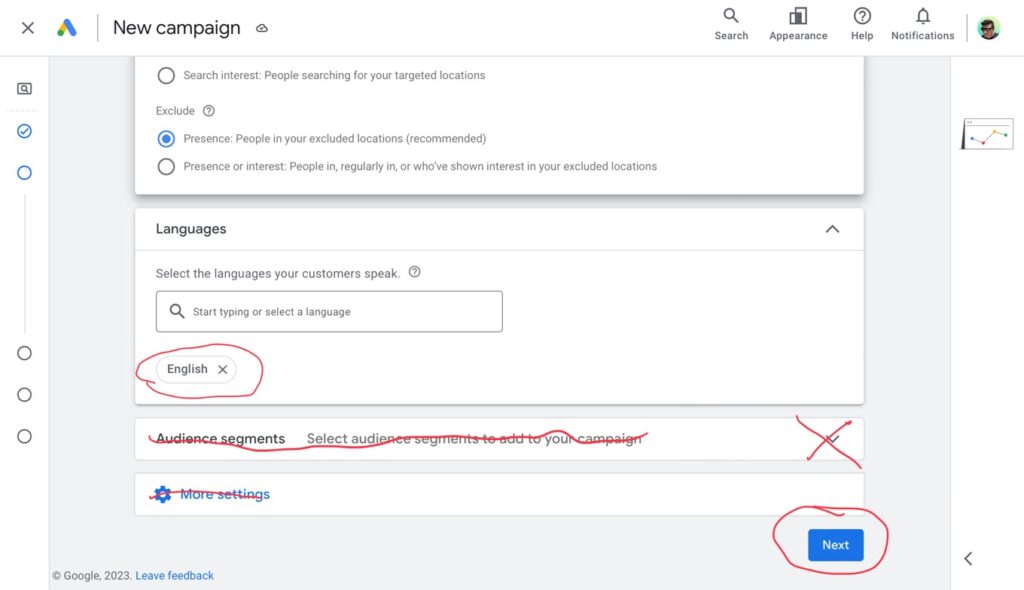
Scrolling down some more, we’ll leave the language set to “English” (as my website is in English and so will my ads). Then, ignore the “Audience Segments”. That has to do with display ads, video ads, and remarketing (not really search related). So we’ll leave that alone. You can also leave “More Settings” alone. Those will be preset properly. Now just click “Next”…
We are now in the “Keywords and ads” portion.
Back before everyone had a broadcast-quality camera and video editing software on their phone, I used to sell video production services. So the example I’m going to use here is for a video production business.
I already know the keywords that I’m going to use. I figured them out back when I did my keyword research. If you skipped that lesson, I’d go back to my lesson on keyword research and learn how to find your money keywords. So the keywords I’m gonna use are:
- video production company
- video production companies
- video production service
- video production services
As you can see, they all start with “video production” but end with other words. Those other words can be grouped into two groups (a “company” grouping and “service” grouping). In Google Ads, these are called “Ad Groups”. And that’s where we’re at in the campaign setup now, the Ad Group setup.
So for my first Ad Group, I’m titling it “Video Production Company” and adding the “production company” keywords…
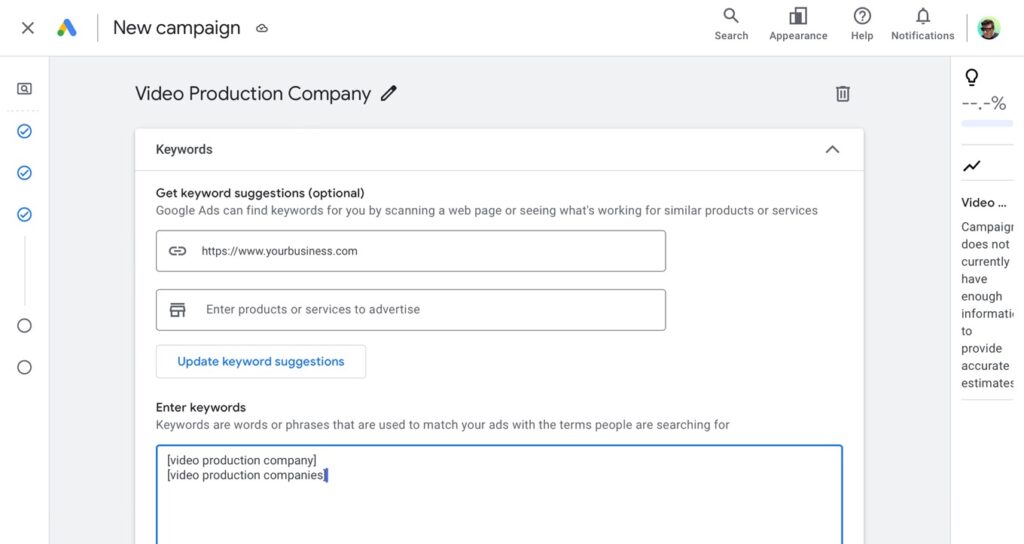
Notice the “[“ at the start of each keyword phrase and the “]” at the end. That tells Google to use the “Exact Match” setting (which makes your ads only show when people type that exact phrase). If you leave the brackets off, Google will use the “Broad” setting which shows your ads whenever someone types anything at all that happens to have any of those words in it. That’s not what you want! That will waste your budget! You only want your ads to show when people type the exact phrase. But you can always change each keyword’s setting after your campaign is set up. I just like to do this little trick during setup to save time.
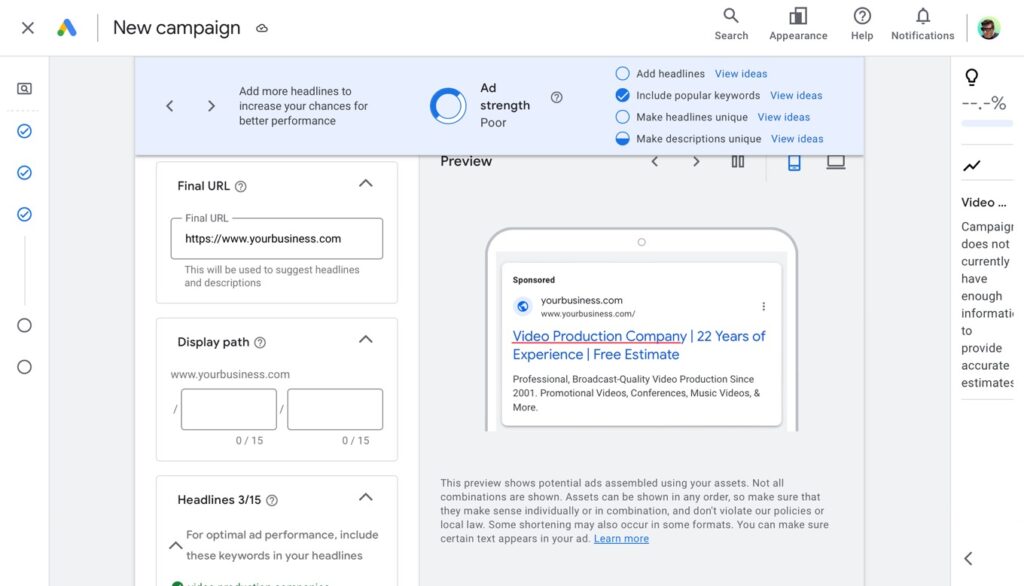
Scrolling down a bit more, we will now create the ad for this Ad Group. At least three headlines are required and at least two descriptions. Make sure one of your headlines is the keyword phrase (not the plural one- the singular “Video Production Company” one). Including it as one of the headlines is also for relevancy scores…
On the next screen, set your daily budget. You can change it later. Just put something for now until you know more later- after the campaign has been running for a bit…
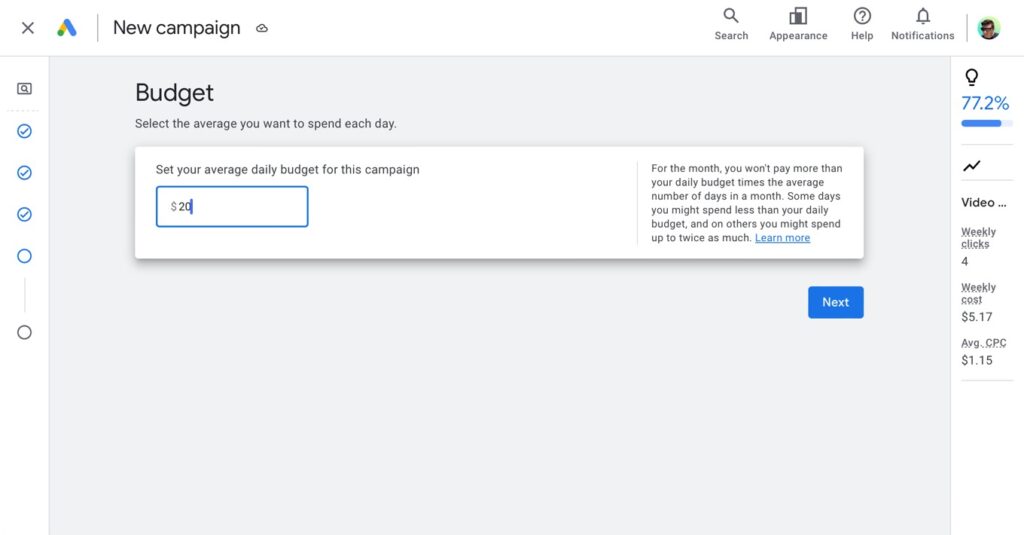
Then just click “Next”, review your campaign, and publish it. After that though, I need to go to my campaign (in the “Campaigns” section) and set up another Ad Group because I still need to set up that other one (for “video production service” keywords). So I would add a new Ad Group there, title it, add the keywords, and write the ad with the keyword phrase as one of the headlines.
After a day of running the campaign, come back to Google Ads and open the campaign. Check the keywords and see if you are bidding enough. There will be a little red warning saying that your bids are too low (for each keyword). Just adjust them accordingly. And keep checking them once a day for awhile. That’s the best way to know the true cost per click for each keyword.
Adding Bing, Yahoo, & Others
Getting found with your ads on Google and their network is good because that covers 80-90% of all the search traffic online. But when you set up a paid search campaign with Microsoft Advertising, you reach that remaining 10-20% too. Microsoft has their own network that includes Yahoo and lots of other search engines. So by setting up campaigns on both platforms, you can be found no matter what search engine the user uses… period. Plus, the cost for keywords on Microsoft are all much cheaper than on Google Ads.
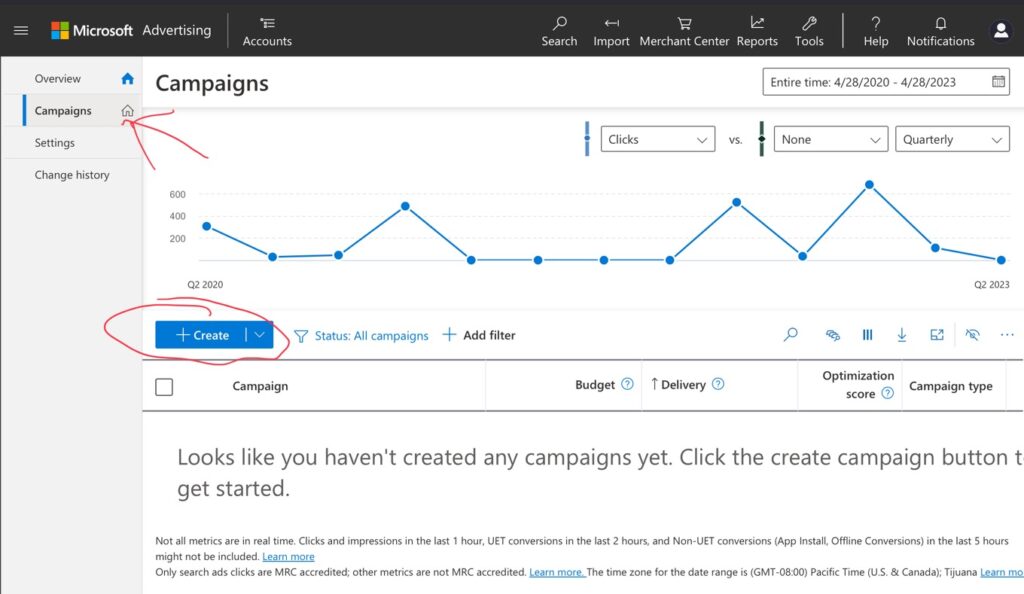
To set up a campaign on Microsoft Advertising, go to:
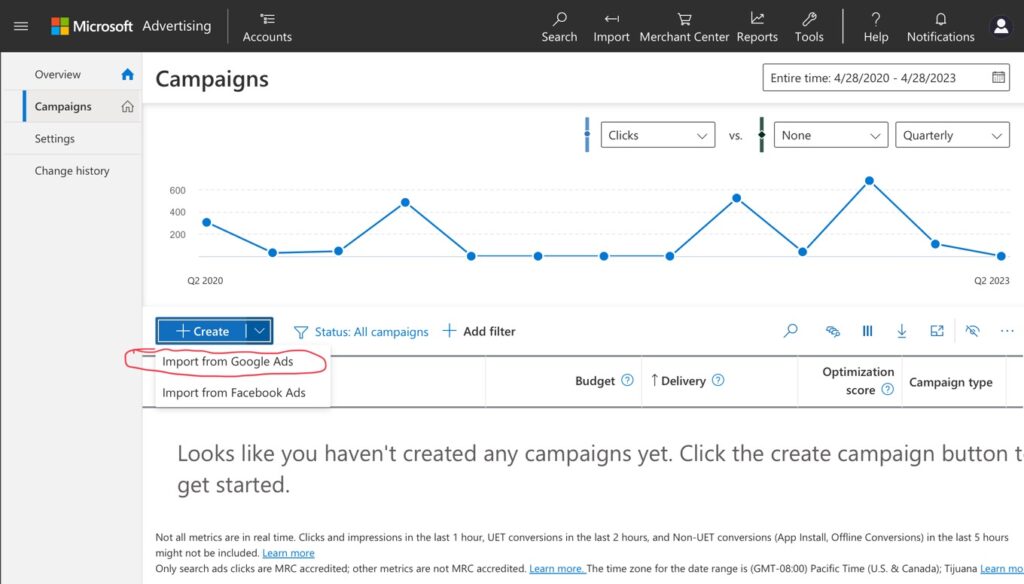
and sign in with your Microsoft account. When you are in, click on “Campaigns” on the left column and then click on the “Create” button…
You can then click “Import from Google Ads” and try importing…
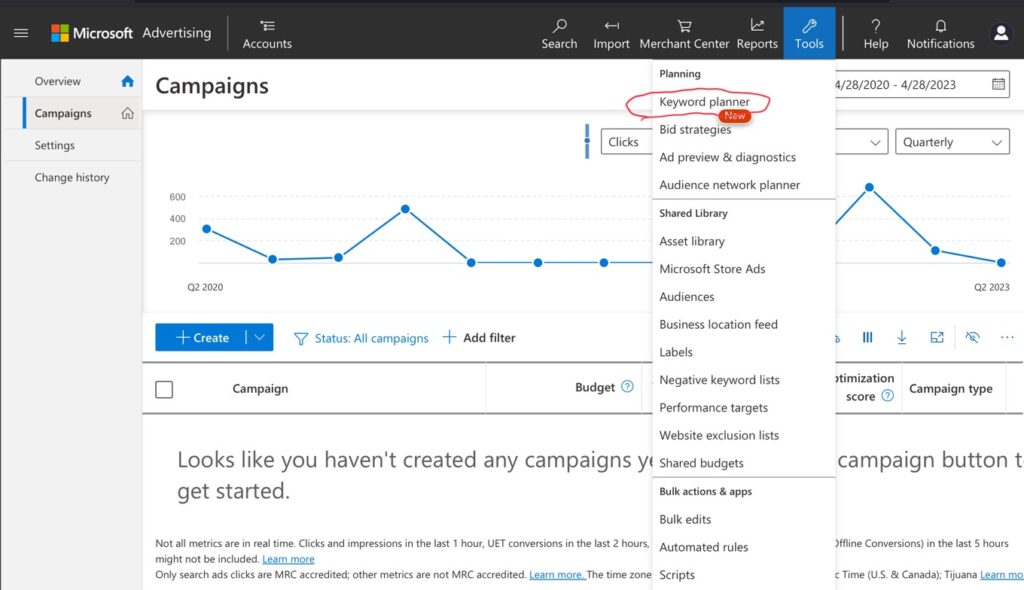
If that doesn’t work or you want to set up a Microsoft campaign without Google, you can still set up your campaign manually. Go to the “Tools” icon in the top bar and click on “Keyword Planner”…
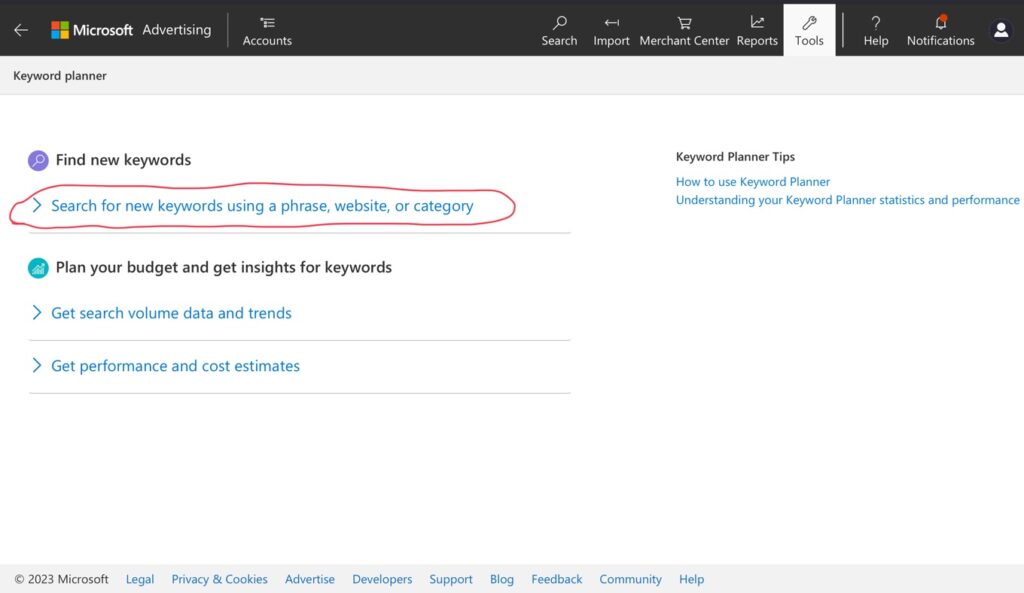
Now click on “Search for new keywords using a phrase, website, or category”…
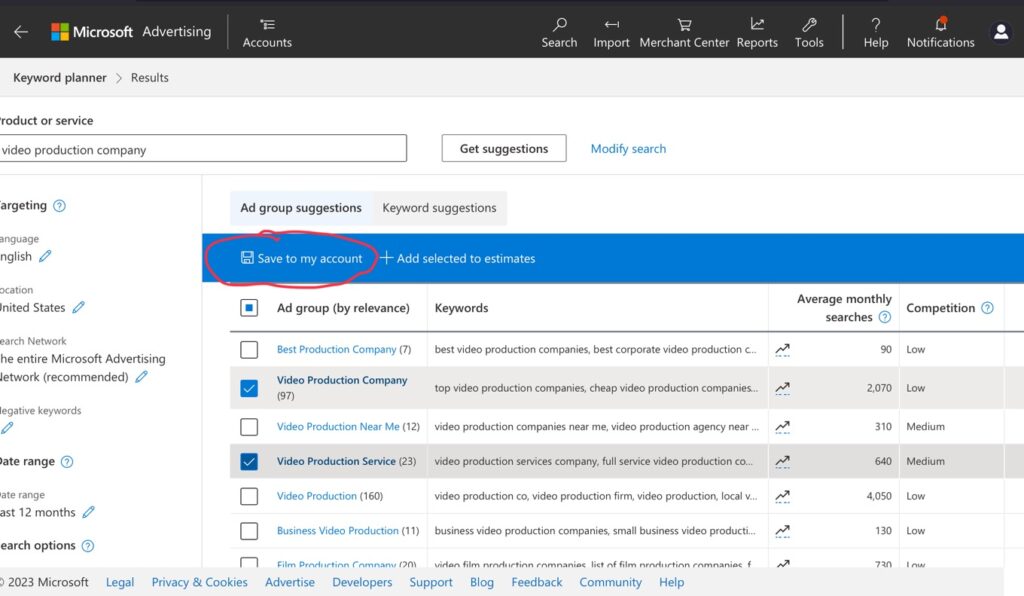
When that opens, I’m going type my keyword phrase that I already have into the “Product or service” field. It’s already perfectly descriptive of what my service is…
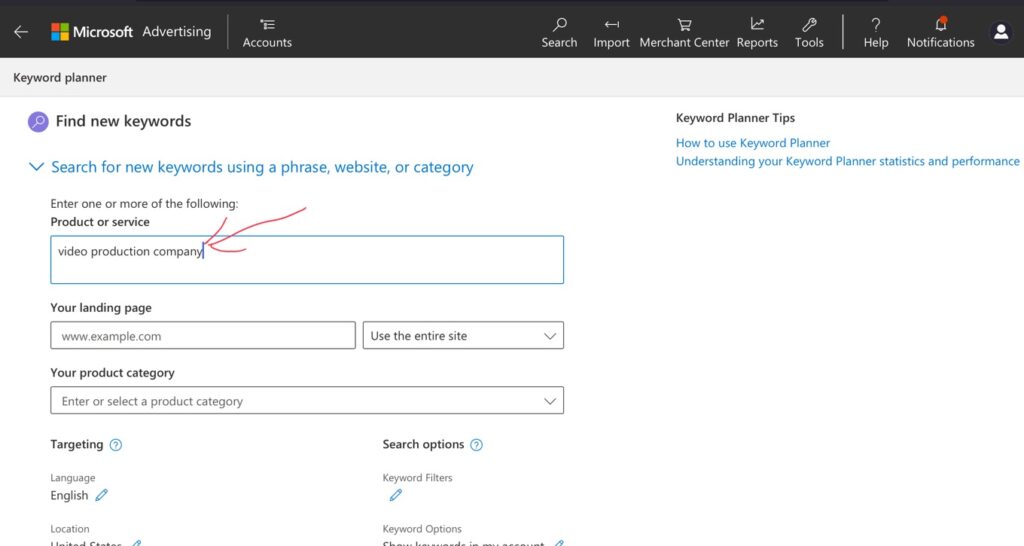
It has now pre-generated some Ad Group ideas (just like how I had Ad Groups in Google Ads). I see that there is already an Ad Group for “video production company” and “video production service” (the two I used in Google Ads) so I’ll check those two and then click “Save to my account”…
Now, I’ll go into the campaign which has been auto-created for me and edit everything:
- Set the location(s) that I want the ads to show in.
- Change all the keywords to “Exact Match”.
- Remove any keywords that I don’t want.
- Set bid amounts.
- Etc.
Well that is paid search advertising. And paid search is part of what we call “inbound marketing”. If you find it is far too expensive, you should consider “outbound marketing” instead (which is normal advertising- going out and getting the word out). My next section of lessons is all about those forms of outbound advertising…