Advertising Nationally With Native Ads
(Broad Niche)
A lot of people learning my lessons may not have a local business. They might have a small business but they are targeting customers all across the country (or maybe even internationally). This may be people who have an e-commerce site, sell some kind of downloadable software or other digital product, run a SAAS site (Software As A Service), or they offer some kind of consultancy service to clients who can be located anywhere. If that’s you, I finally have advertising information for you. This lesson is on advertising nationwide (or globally) in a broad niche.
What Do I Mean By “Broad Niche”?
A “broad niche” means your niche is broad. Haha! Obviously. But in all seriousness, it means that you are selling something for everyone. This might be:
- Clothes
- Food
- Products found in anyone’s home
- Vacations
- Health products
- Health services
- Financial services
- Insurance
So basically, as long as your customer is a human being, they have a need for your product or service. That’s a broad niche business. And the advertising method that I’m going to cover in this lesson are methods where you don’t target by niche. For example, if you’ve got a site that sells shoes, you might want to target users interested in shoes (like you do with Google Ads, YouTube, and Meta). Well with this advertising method, such targeting is not an option so you need to be selling something for anyone.
And on the upside, this national (or global) method where you don’t target by niche is cheaper than cheap! (compared to Google Ads and Meta). Let’s get into it…
Native Ads
The method in which we’re going to advertise is with something called “Native Ads”. Native ads are those articles that you see on news sites that look like articles, but after you click on them and read them for a bit, you realize they’re actually ads. They came about because people got jaded to traditional banner ads (or “display ads” as Google calls them). So the industry needed something better. You know you’ve seen them…
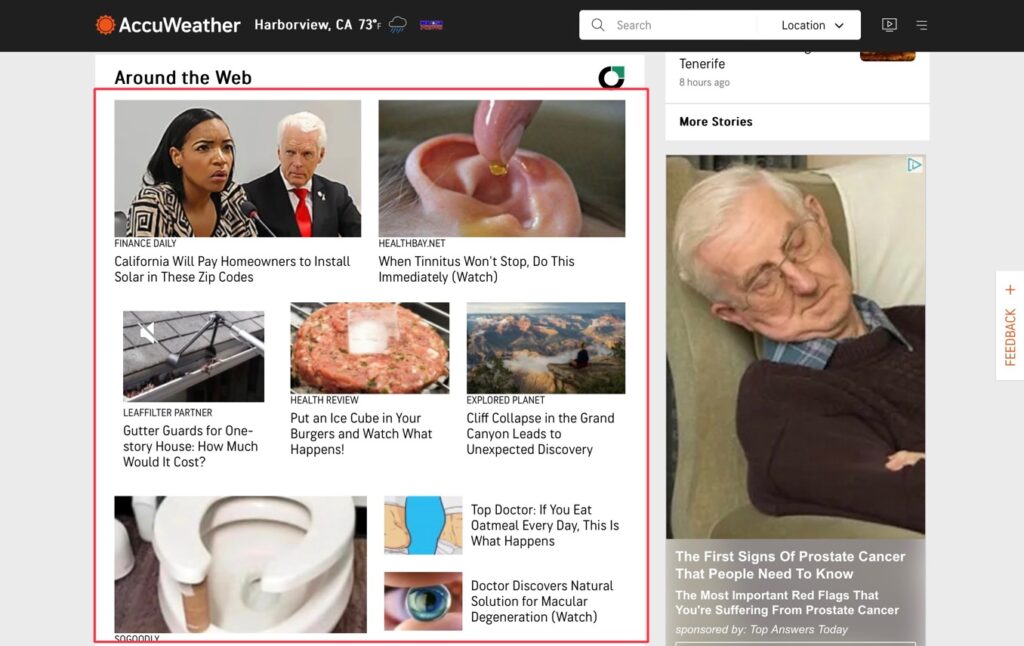
If you were to click on the “ear” one, that article might talk about some ear cleaning hack but will probably also sell hearing aids or something. The “cliff collapse” one might talk about some mineral discovery and sell supplements and the “oatmeal” one probably talks about some diet program. See what I mean?
So the first thing you’ll need to do is write an article such as that.
Next, you are going to purchase advertising through a native ad network. There are many out there and they all have similar pricing, cheap! (as many of them operate out of Eastern European or developing countries). And I wouldn’t think lesser of them because of that. Technologically, they can still be on par with Google or Meta. So why not use them? They’re cheaper!
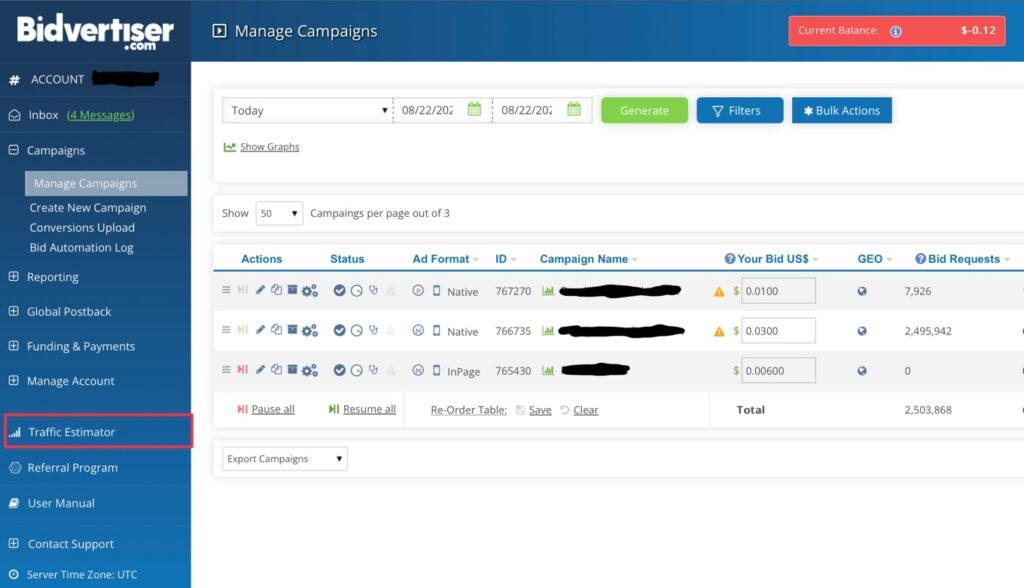
Bidvertiser.com
There are many native ad networks out there (and you should shop around and test them) but I’m going to use one for this lesson that I’ve been using myself, have gotten good results from, and love the low cost more than anything else… an ad network called Bidvertiser.com.
First, create an advertiser account at Bidvertiser.com.
When you’re all set up there and have loaded your account with at least $100, use the “Traffic Estimator” located on the left column…
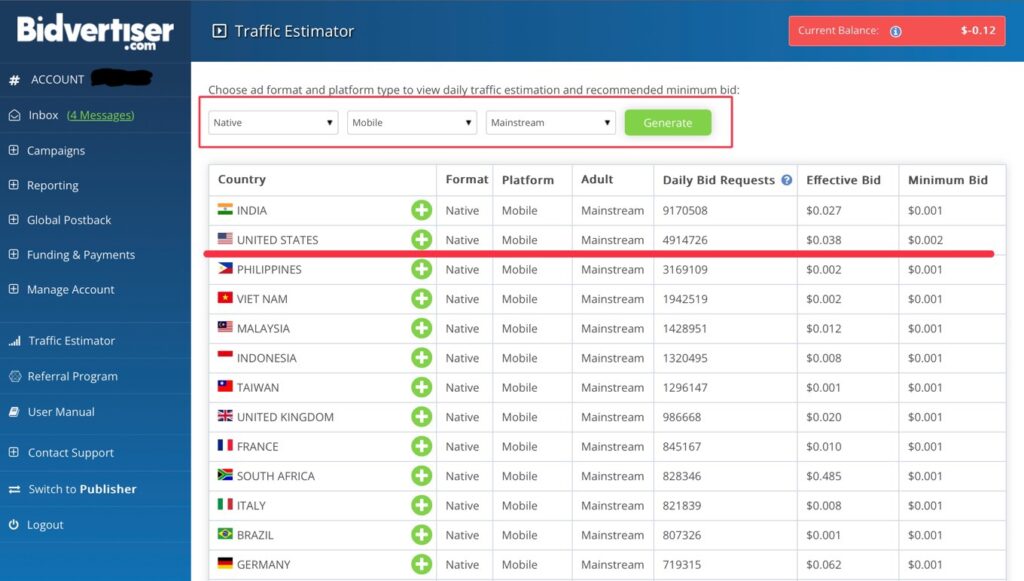
Inside the “Traffic Estimator” screen, set your parameters. Choose “Native” for “Select Ad Format”, choose “Mobile” for “Select Platform Type”, and choose “Mainstream” for “Select Traffic Source Type” and click “Generate”. It will bring up traffic estimation for those parameters. For me, I’m interested in the United States only and I can see now that effective bid is $0.038 and the minimum bid is $0.002. That means that the least I can bid is $0.002 but to be effective (beat out other advertisers) I have to bid $0.03 cents a click. Not bad for U.S. targeting! (the country most desired by marketers)…
By the way, just to explain why I set those parameters:
Ad Formats:
“Direct Ads” show on expired links. The problem with them is people land at them on accident. People aren’t exactly thrilled to see your ad there.
“Pop-Under Ads” are those ads you see that popup underneath your web browser. Users only see them very briefly when they are closing their browser (and all the additional windows that forced-opened along with it). They just annoy people and you can see why they don’t work well. That also makes them the cheapest of the bunch. But not worth it. They also make Google think your website is visited by only bot traffic. That’s not good for SEO.
“In-Page Push Ads” are the same kind of thing but they show as push notifications on the user’s phone or computer. They are triggered by the website that the user is visiting and show in their web browser. The user opts-in to receive them so these ads are not as intrusive as pop-unders but still are. They are also cheaper than native ads but don’t work as well.
“Push Ads” are the older version of In-Page Push Ads. The difference is Push Ads show directly on the user’s phone or computer while In-Page Push Ads show in their web browser. Most phones block these intrusive ads so there are hardly any opportunities with these older Push Ads.
So native ads of course work best because they match the look and feel of the website they display on and people are actually interested in reading what your article is about. Plus, traffic from native ads tend to spend time on your page compared to the other formats (which also sends a good signal to the Google algorithm by the way).
Platform Type:
The reason I checked mobile instead of desktop is because mobile is where the majority of the traffic will come from. Most people are on their phones when they’re online (so much so that I don’t even bother with desktop anymore). I always just choose mobile. Even if I’m promoting desktop software, I still run the ad on mobile. That’s how much larger the mobile traffic pool is. In addition, targeting desktop on Bidvertiser will cost over $0.15 cents a click! Way too much.
Traffic Source Type:
The two choices are “Mainstream” or “Porn”. When you get into these cheap, alternative, ad networks you’re kind of getting into a shady world. A lot of marketers of penis enlargement pills and gambling sites use these advertising methods. So the “Porn” setting is to cater to them. On the upside though, Bidvertiser’s “Mainstream” pool of publishers is much larger. You can test the different native ad networks to see which cater more towards mainstream and which are more adult. Taboola is one that I’ve found to be completely mainstream and Mondiad is one that is more adult.
Now let’s get started on creating our first campaign.
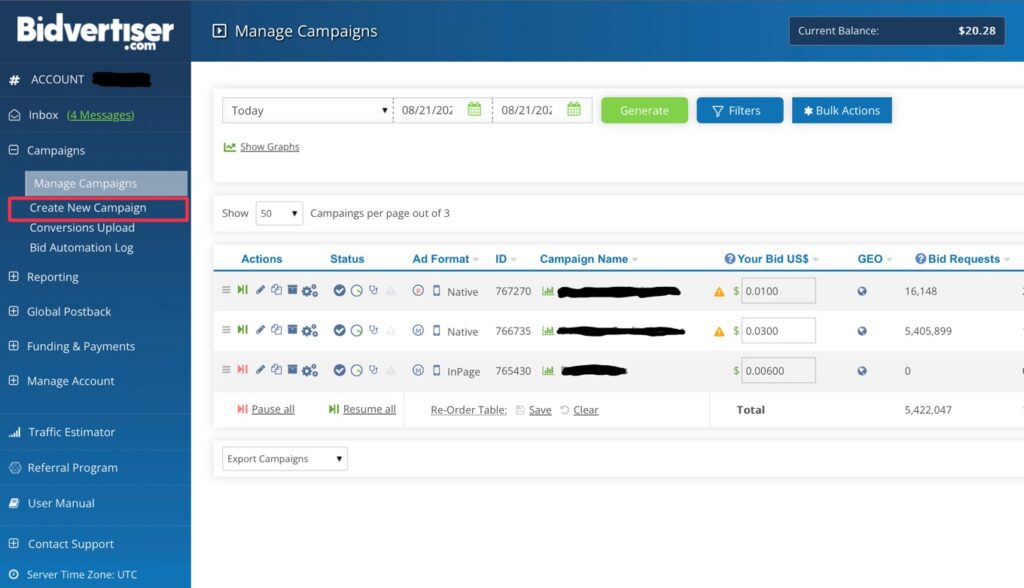
Create your campaign by clicking on “Create New Campaign” on the left column…
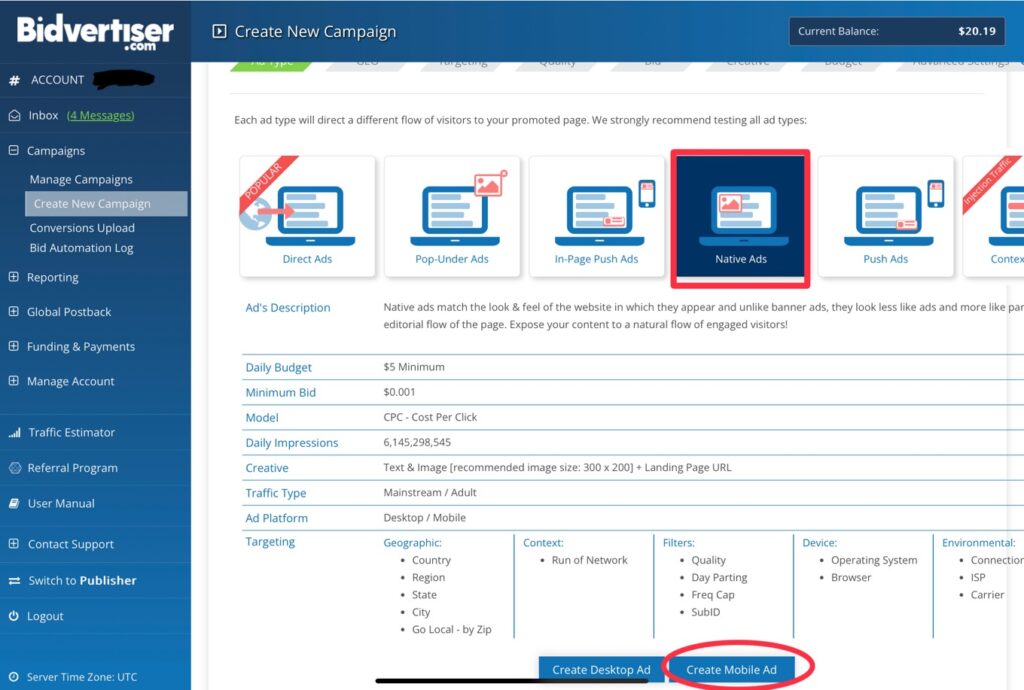
Now you’ll choose “Native Ads” and click on “Create Mobile Ad”…
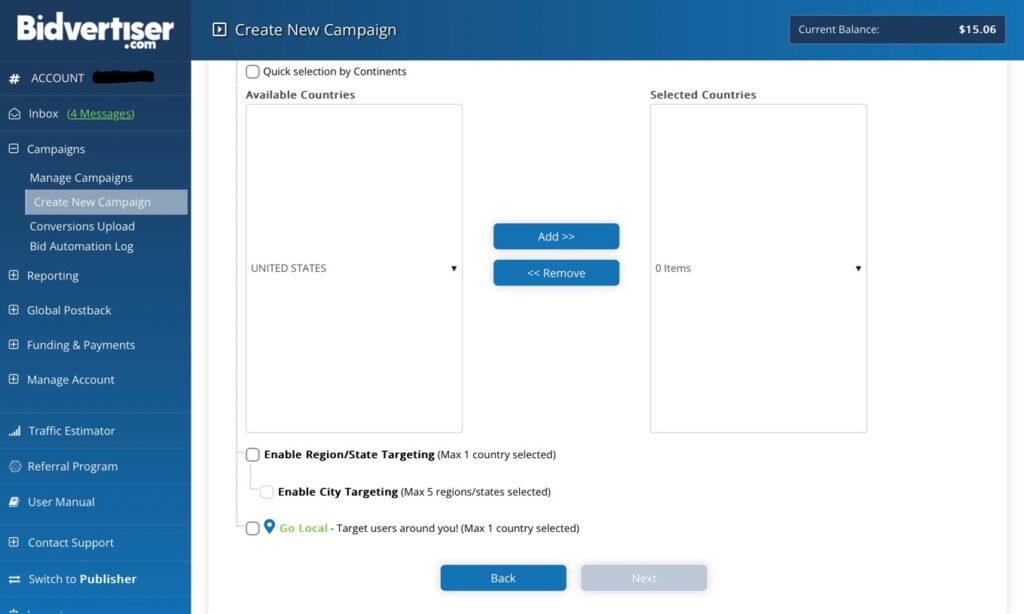
Next, select the country or countries you want to target…
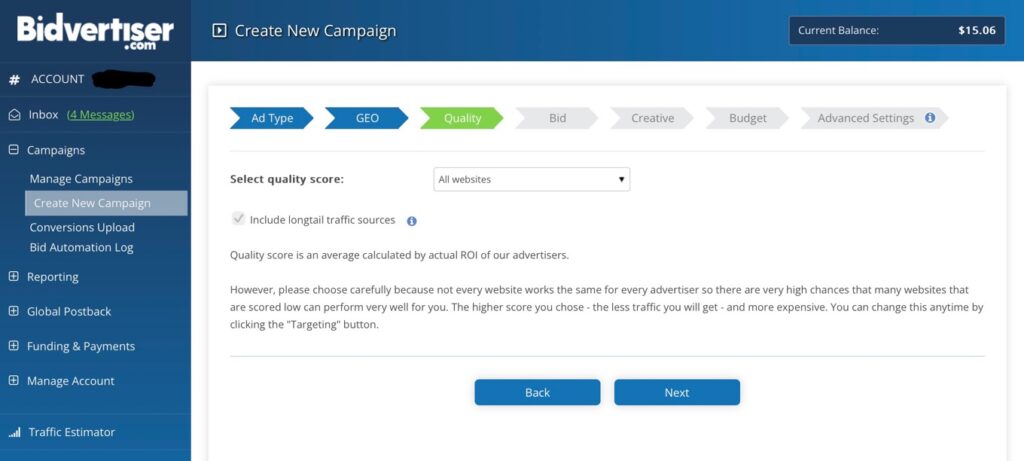
Now, you can keep the “Select quality score” set to “All websites” and leave the “Include longtail traffic sources” checked. That’s all fine. The more places to show your article, the better (as you never know where the actual converting traffic will come from). We will set up tracking shortly and track that way…
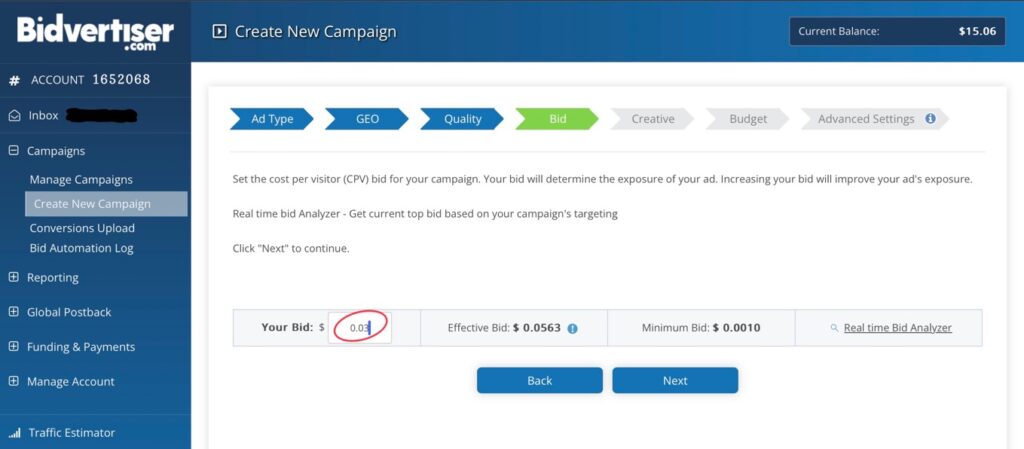
Next, we’ll set our bid amount. It says that the effective bid is $0.0563. That’s only because I’m not really setting up a campaign. I’m just doing this for demonstration purposes (without actually selecting any settings). So the effective bid is showing a higher number in the screenshot below. Earlier, I used the Traffic Estimator tool to find that a good effective bid is $0.03, so I’d enter that…
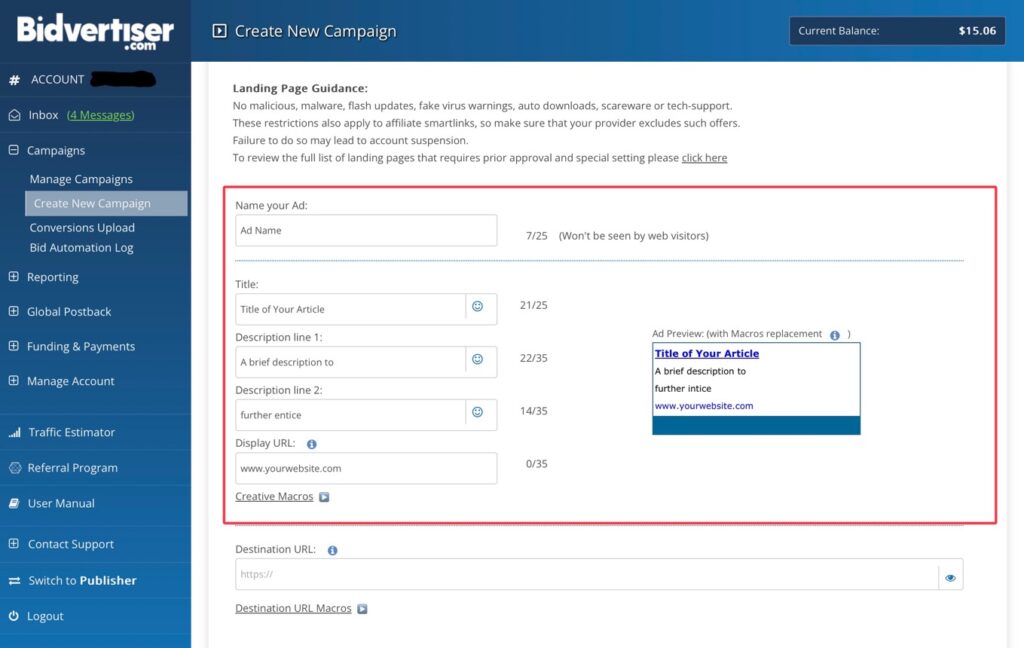
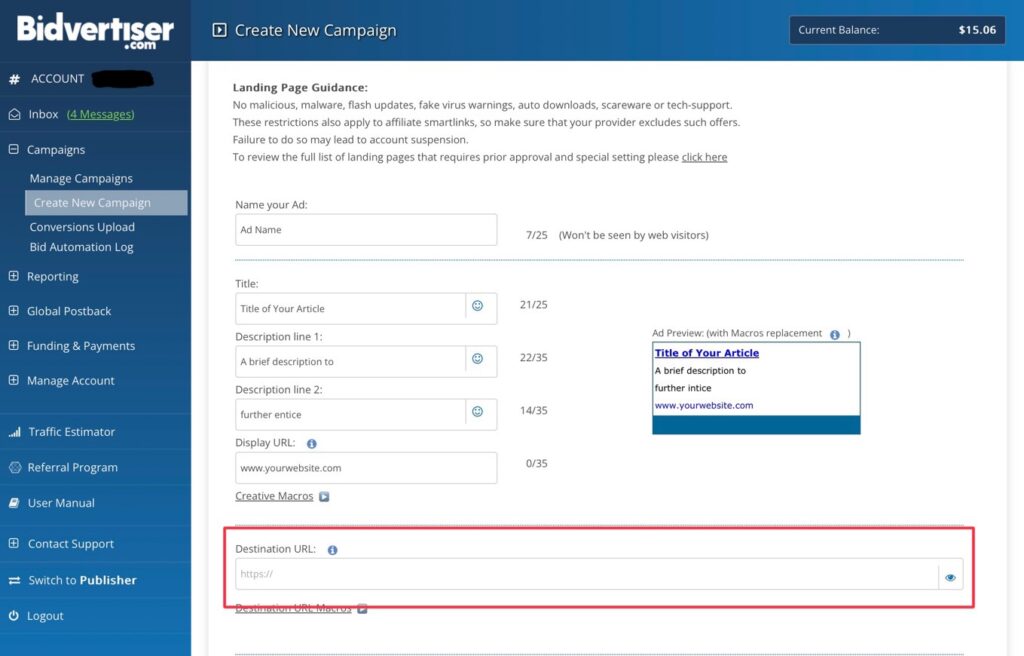
Now we’ll work on the creative. First, you’ll name your ad. This information is only for you. It won’t be displayed on your ad. Next, type the title of your article into the “Title” section. This will be shown publicly and it is important that it matches your article’s title so it looks like a real article when it’s displayed on publishers’ websites. Then, write a brief description below that. It can reiterate or further explain the title. And finally, add your website’s URL. This is for branding purposes. It doesn’t have to be the actual link to your article. It’s just something visual that people will see (like the domain name of your homepage)…
After all that, you will now enter the actual link to your article. But! First we’ll need to add tracking code to your link. This is important because, later on, we’ll want to use Google Analytics to monitor the traffic we get from Bidvertiser and block publishers that send us bad traffic. It saves you money in the long run. At first, you overspend, and gradually save as you block bad sites (focussing only on the good ones eventually).
So, to get the tracking link we’ll have to use Google’s URL builder. Open a new tab (to keep your Bidvertiser work open) and go to:
https://ga-dev-tools.google/ga4/campaign-url-builder/
And switch the switcher to GA4 (as that the latest version of Google Analytics that everyone now has to use)…

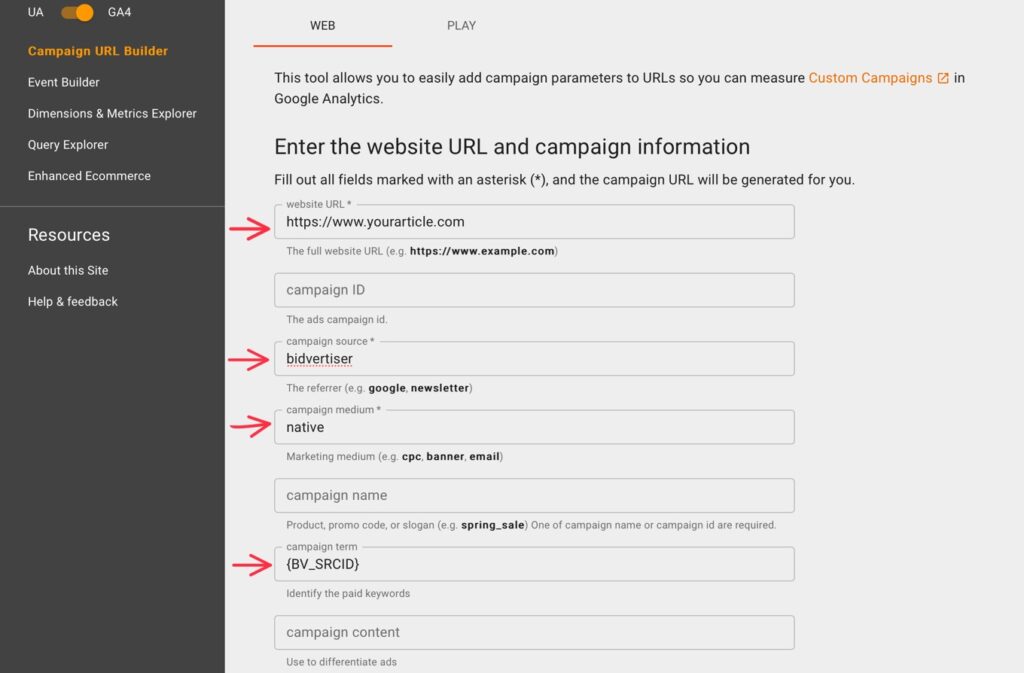
Now, leave it on “WEB” and enter the link to your article in the top field (“website URL” field). Then in the “campaign source” field, put “bidvertiser” (that’s so you know the visits came from Bidvertiser when you’re in Google Analytics later on). After that, put “native” in the “campaign medium” field (so you know the visits came from native ads). And finally and most importantly, put “{BV_SRCID}” in the “campaign term” field. That will let you see which Bidvertiser publishers are sending you good traffic or bad…
Next, as you scroll down a bit, you will see your created link (based off of the information you typed). You will copy it there. Except! There is a small problem. The link generator didn’t covert the “{“ and “}” in “{BV_SRCID}” so you’ll have to change the “%7B” and “%7D” back to “{“ and “}” before copying and pasting (or can change it after pasting the link into Bidvertiser)…
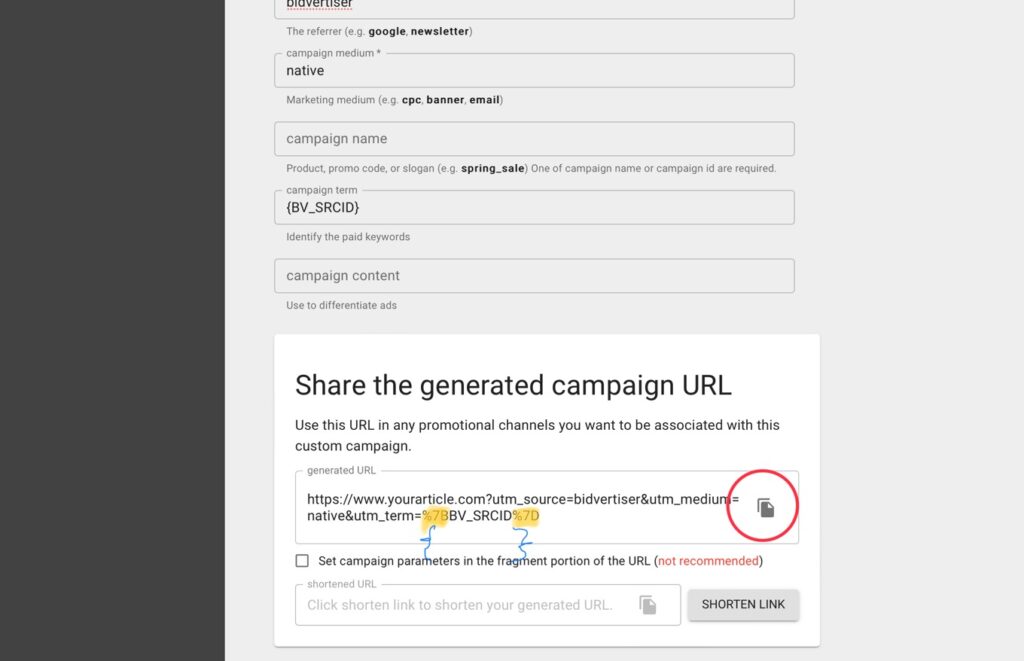
Now go back to the Bidvertiser tab and paste the generated link into the “Destination URL” field. Make sure the “{“ and “}” are in there and not the “%7B” and “%7D”…
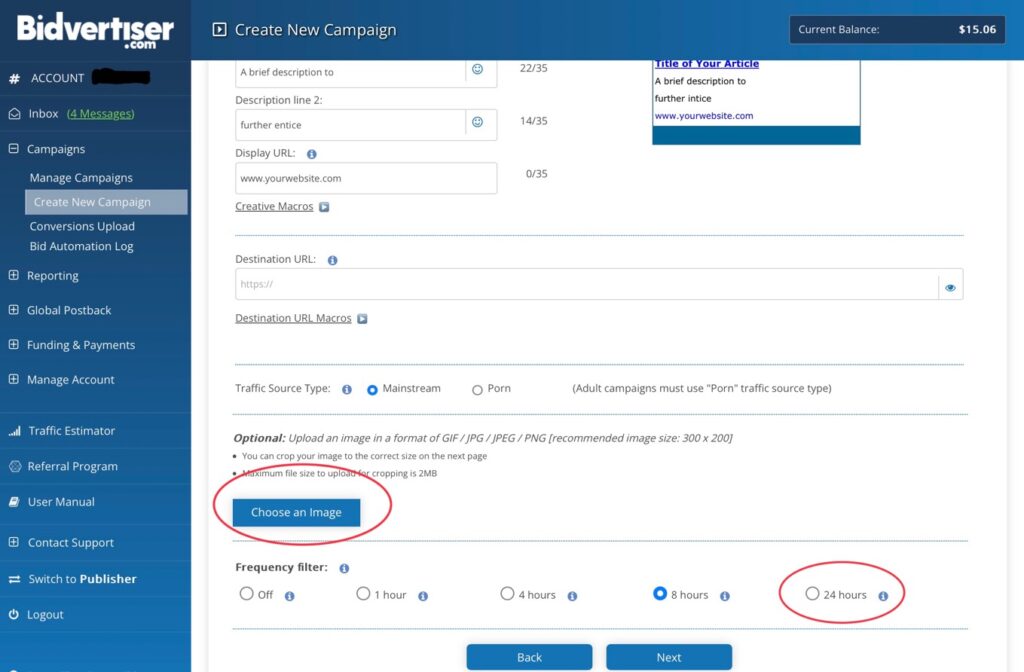
Next, we’re gonna add the image by clicking the “Choose an image” button and uploading it. The image should just be whatever you used for the featured image of your article. It should also be attention grabbing. We’ll also set the “Frequency filter” to 24 hours a day. That’s the same as capping frequency to once a day (on other ad platforms). Once a day will slow spending down and not over-annoy people…
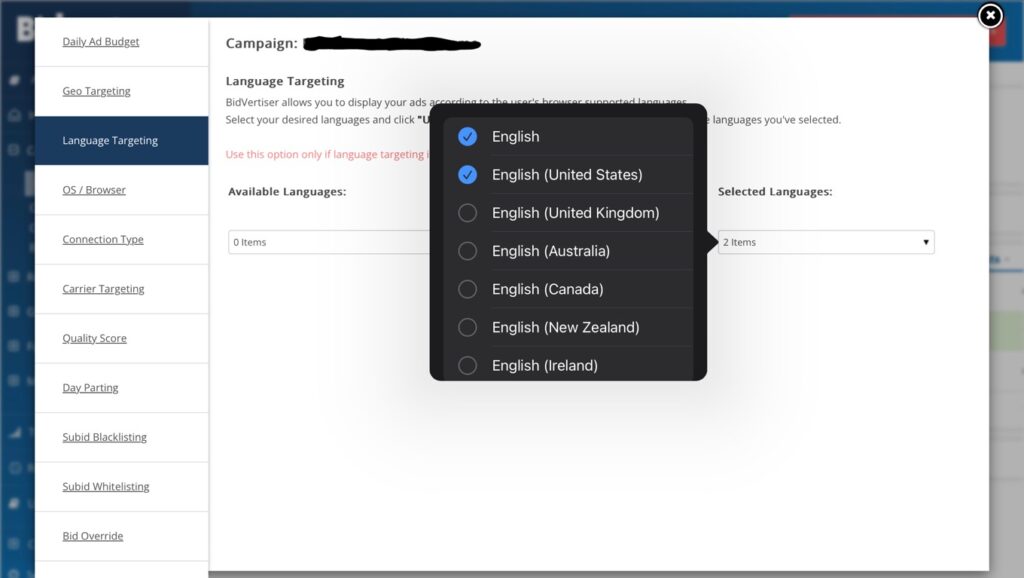
Once your creative is complete and pending review by an employee at Bidvertiser, there is one more thing that needs to be done (which wasn’t part of the setup process). We need to target languages. Since I’m running a U.S. only ad in this example, I’m of course going to set my languages to English and English U.S. I really only want people who are using English browsers to see my ad as it is in English (and so is my article). That narrows the audience down even more to the right people, saving me money. And if I were targeting many nations, I would still target only people with English browsers (as is matches my content).
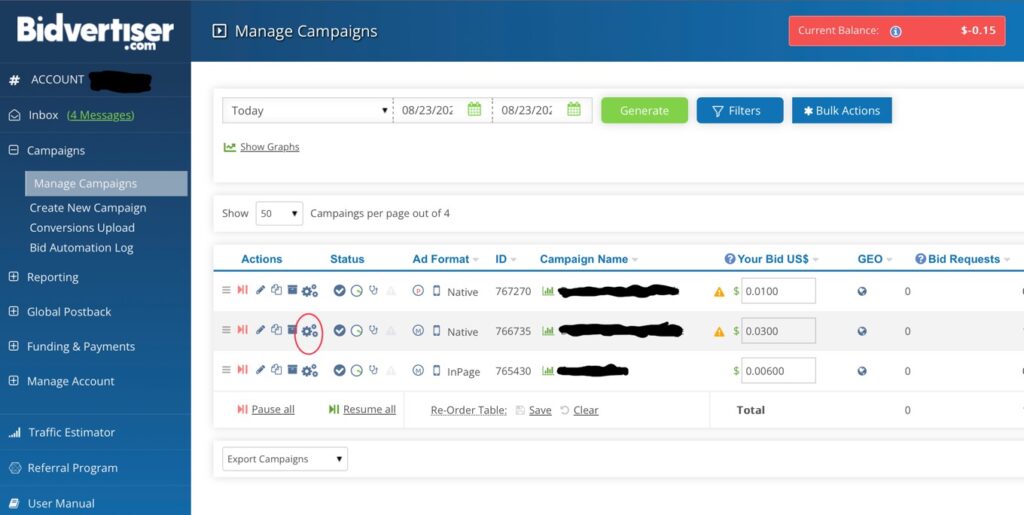
So let’s go to the “Manage Campaigns” section on the left column and click the “gears” icon on our campaign…
That will make a large window pop-up over the screen. Click on the “Language Targeting” section and add the English languages…
That’s it for setup!
Tracking & Blocking Publishers
An important part of using these cheap ad networks is monitoring them so you can block the bad traffic sources. Unfortunately, a lot of unscrupulous publishers use these ad networks and try to defraud them and you with fake/bot traffic. Or maybe your ad is showing on a publisher’s website in a spot where people are clicking on it accidentally. Either way, you can detect this bad traffic by looking at the time that stay on your site for. It’s easily viewable in Google Analytics. So all you have to do is track it, detect it, and then block it.
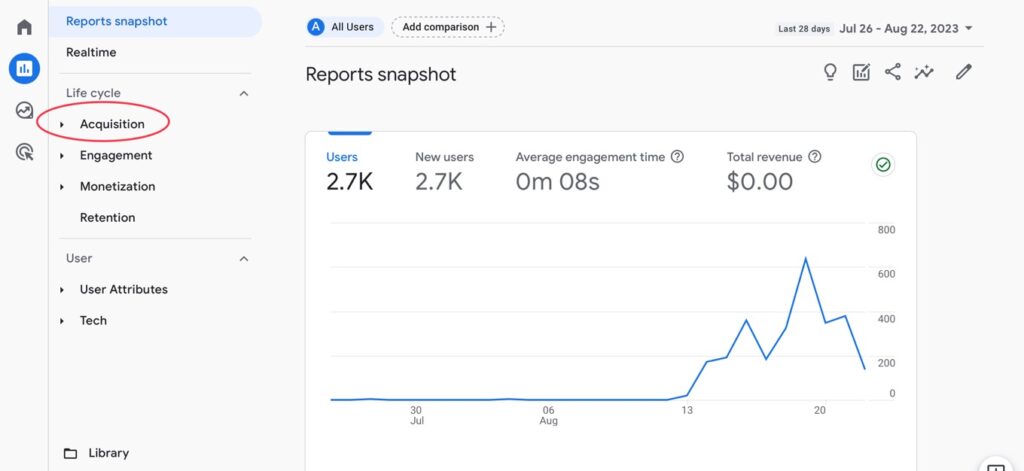
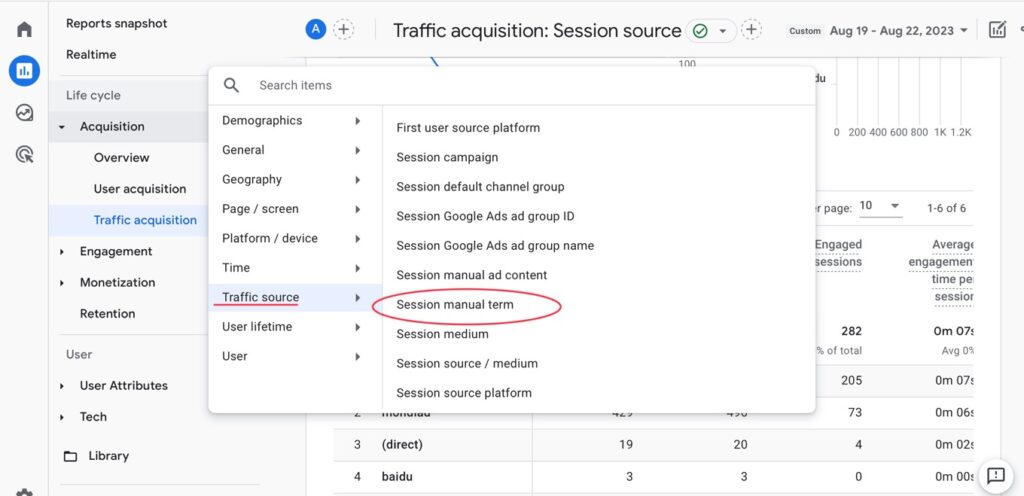
The tracking part is already done (as I covered it earlier in this lesson). So now we’re going to learn how to detect the bad traffic. Go into your Google Analytics account and click on “Acquisition”…
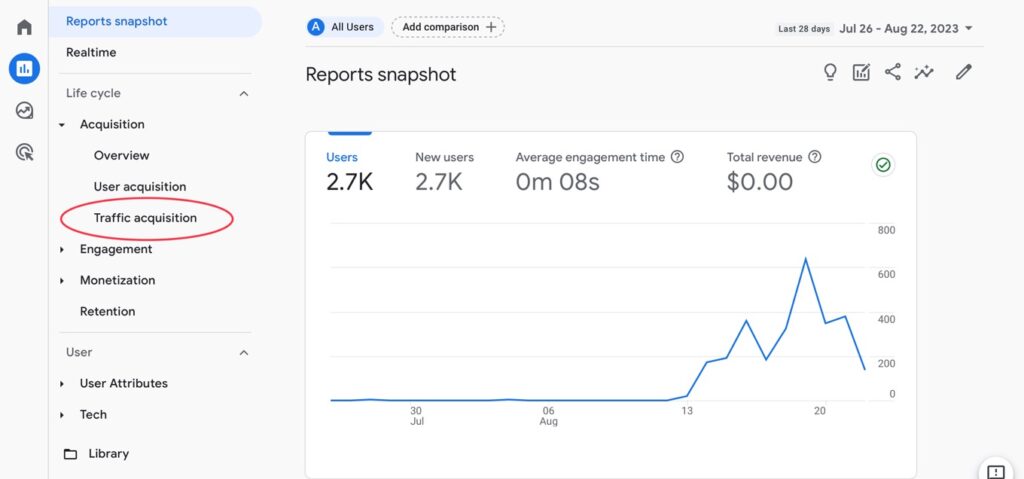
Now click on “Traffic Acquisition”…
Next, set the date range to the same time period that you were running your ad (run your ad for about a week first- at very least, three days). The date range is located at the upper right…
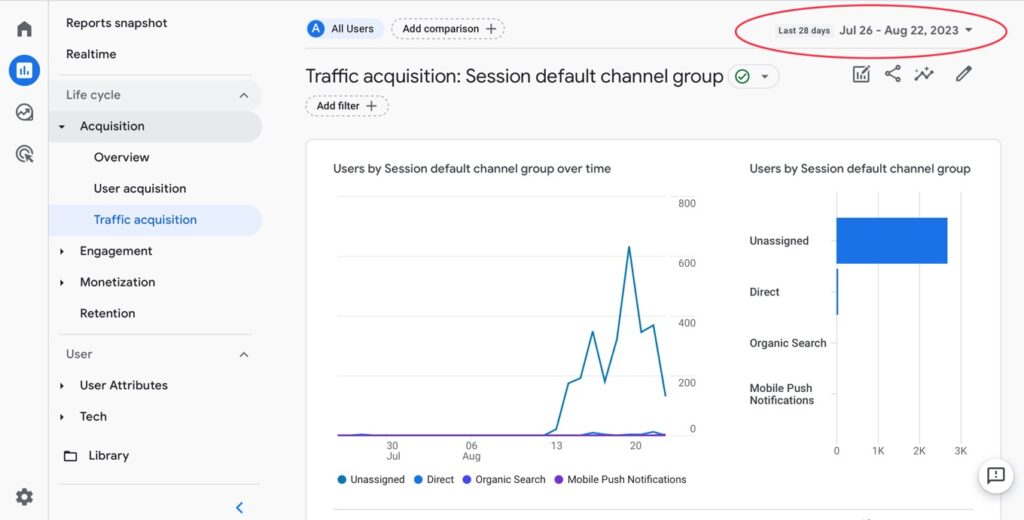
After setting the date range, scroll down a bit and click on the drop-down menu…
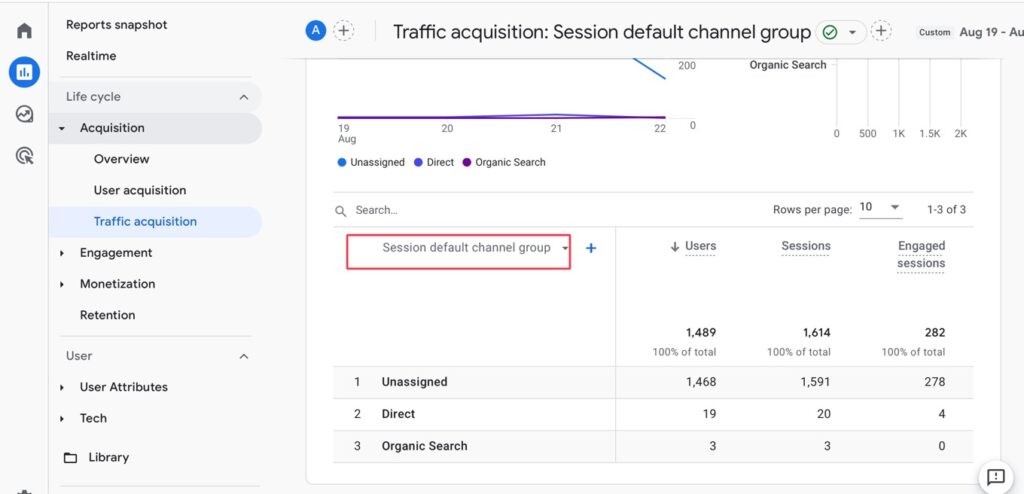
Change the drop-down setting to “Session source”…
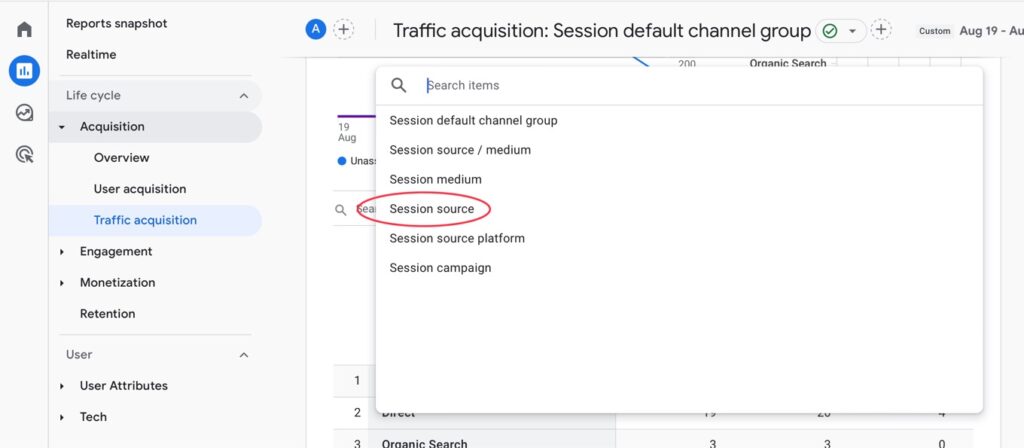
Now click the “+” icon right next to “Session source”…
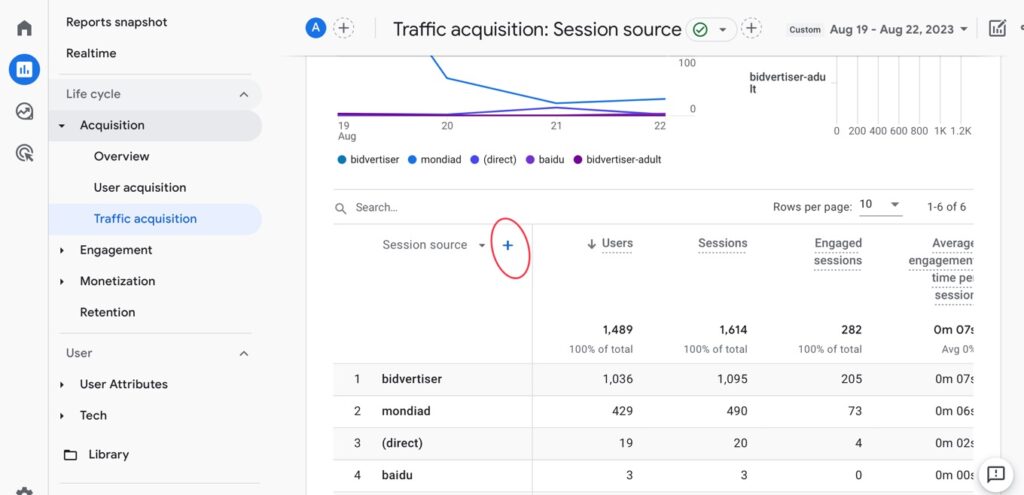
Then “Traffic source” and “Session manual term”…
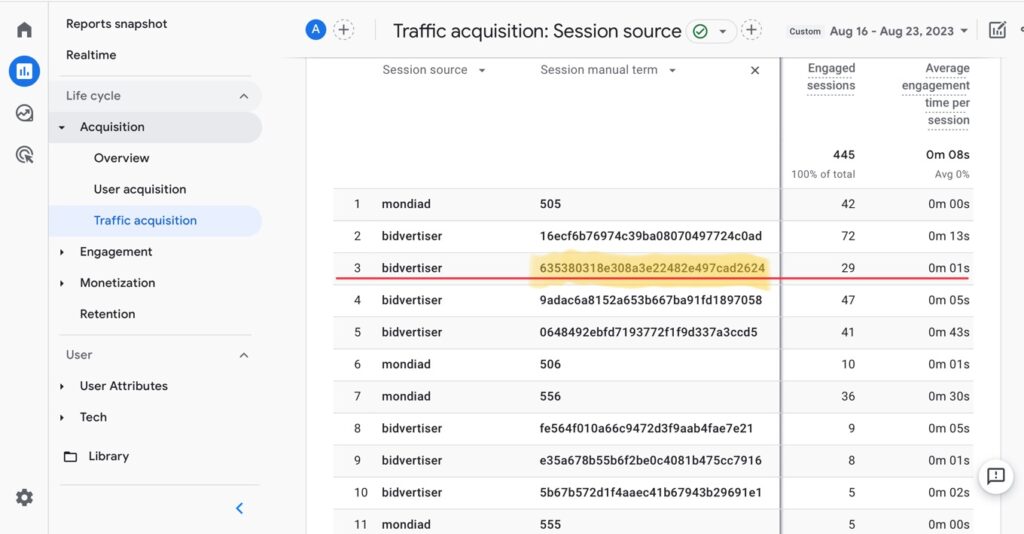
Now we see the information we’re after. One of the Bidvertiser ID’s has sent me 29 engaged sessions that resulted in an average of 1 second of time on my site. That’s pretty close to zero so I’m gonna block that ID number. So I’ll copy that number…
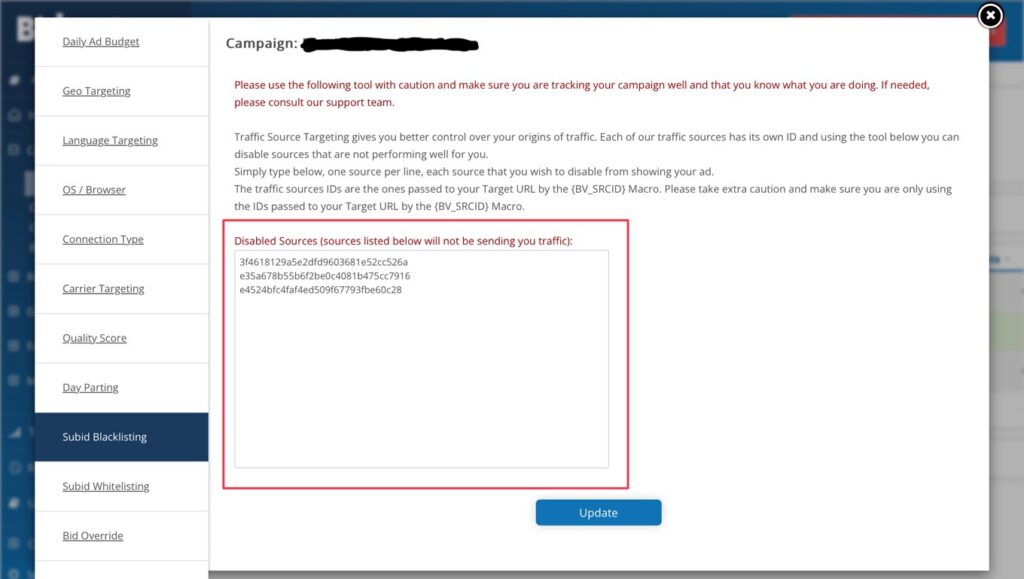
Back at Bidvertiser.com, we’ll click on that “gears” icon on our campaign again and navigate down to the “SubID Blacklisting” section and paste the ID number(s) in the box there…
That’s it! Now just continue to monitor it periodically.
Higher Quality Native Ad Networks
If you’d rather pay more for a higher quality ad network. I recommend Taboola. They are actually the industry standard (the Google Ads/Meta of native ads). They are U.S. based (New York City) so it’s much easier to pay them by credit card than the cheap networks who are located in developing countries. And since they are higher quality, be expected to pay quite a bit more (like $0.15 cents a click for mobile).
Taboola also offers some audience targeting options and they do native ads only. They don’t mess around with the intrusive stuff like pop-unders and push notifications (like the cheap networks do) and they also don’t do adult traffic. So you may want to pay more and use them if those things are a concern to you.
Just know about a couple of differences however. With Taboola, you track publishers using “{site}” (as opposed to “{BV_SRCID}” like with Bidvertiser). You also place your article’s URL and the tracking part of the URL in two different places (not the entire URL combined), you’ll see. Every ad network does things slightly differently.
Now, what if you’re in a business that caters to a very specific niche but you still want to advertise nationally? My next lesson is on that…