Local Advertising
By now, you should have your website ready, Google Analytics set up, and your Google remarketing tag and/or Facebook retargeting pixel installed so your site can track visits to it. Later, I’ll teach you how to run those remarketing/retargeting ads but first we need to start sending initial traffic to your site. If you’ve got a local business, I recommend running:
- Google display ads
- YouTube video ads
- Facebook video ads
- Instagram video ads
I only recommend advertising with those platforms in a local market. Nationwide advertising (or even global) is too expensive on those platforms. Sure, if you’re a large corporation, you can probably afford it but I’m going to assume that most of you have small businesses. If that’s the case, advertising on these platforms isn’t too expensive in a local market because your audience, of course, will be much smaller. So it’s okay to endure those high cost-per-clicks.
All of those platforms are also good for remarketing/retargeting because you run those ads through Google Ads and Facebook Ad Manager.
Google Display Ads
A Google display ad campaign means: your ad will show across a wide network of websites all over the internet (although only in your local area- as that’s how we’ll set it up). And the word, “Display” means it’s going to be an image ad. You can have text ads that show on search engines, video ads that show on YouTube, but this will be still-image ads (display ads).
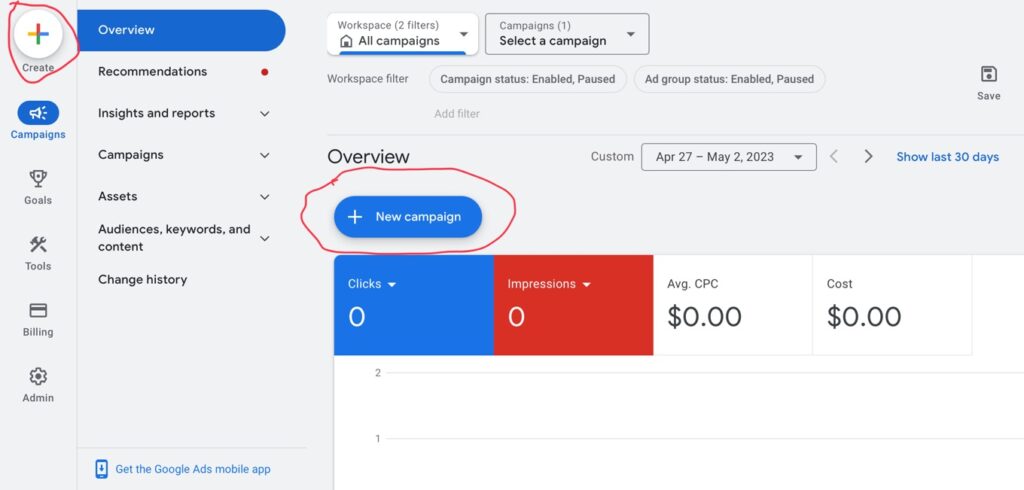
To start, log in to your Google Ads account (the account should already be set up if you’ve been following my previous lessons). So log in and click on the blue “Create Campaign” button or use the “+/Create” button and then click on “Campaign”…
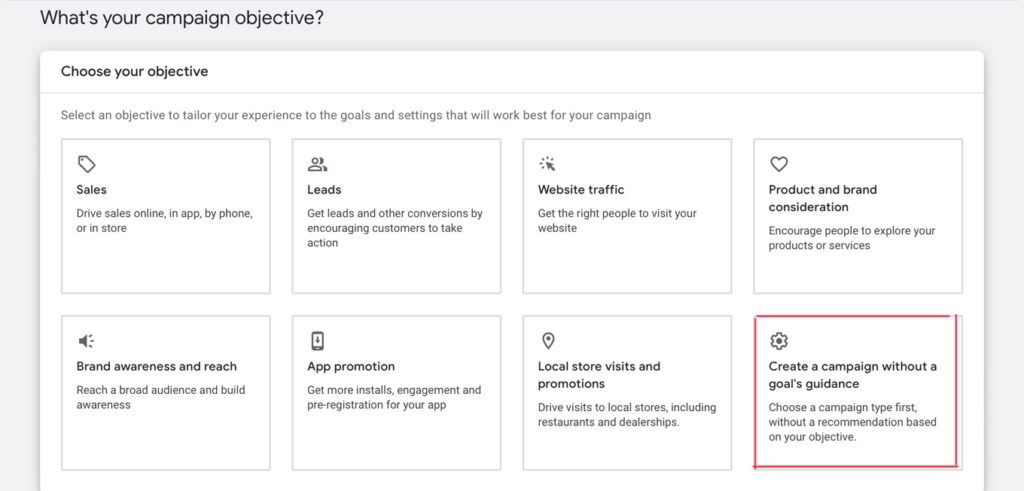
Next, click on the “Create a campaign without a goal’s guidance” square. The reason being is, the other options take features away. So this way, all features are enabled (whether we use them or not)…
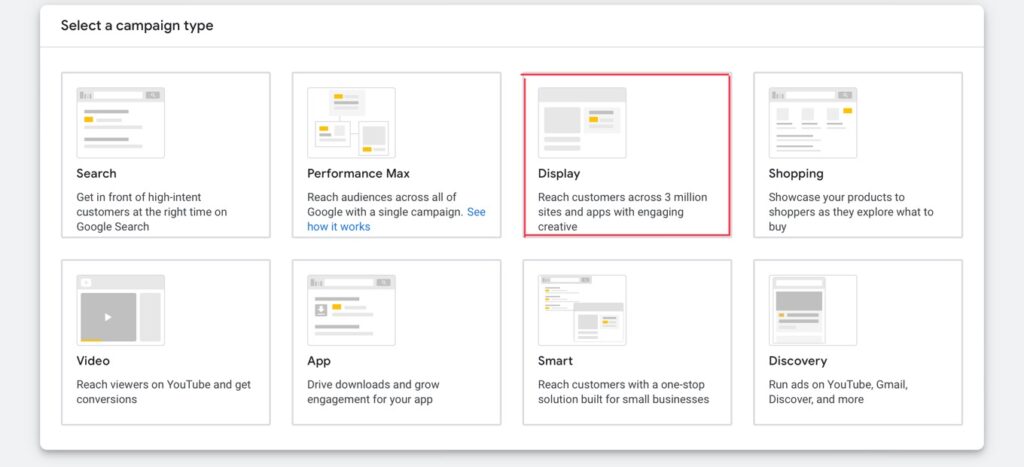
Then, select the “Display” square since we are creating a… you guessed it… Display Campaign…
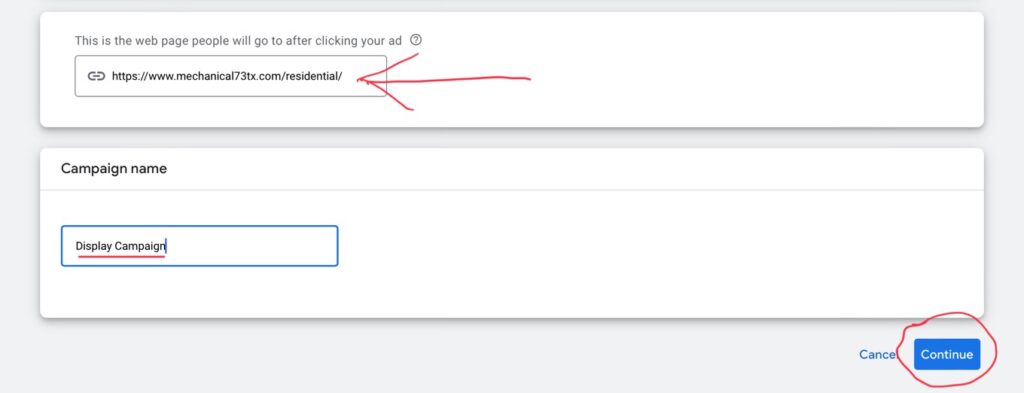
After that, enter the URL of your website or internal page that you want to send your ad traffic to and then title the campaign. I’m just gonna call it “Display Campaign” to differentiate it from other campaigns (such as Search, Video, or Remarketing campaigns). Then click “Continue”…
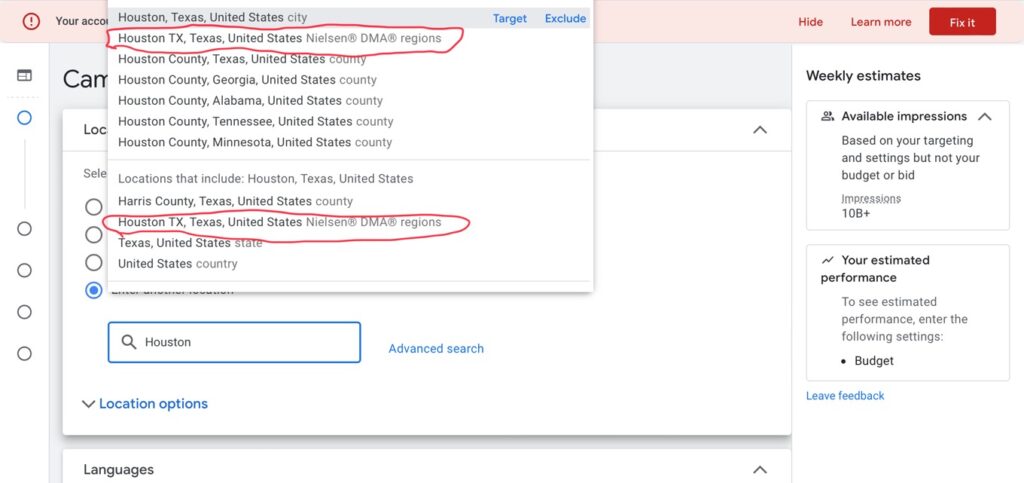
The “Campaign Settings” will now come up and we’re going to start by selecting the location we want our ad to show. To target a local area, select “Enter another location” and type your city name or town name…
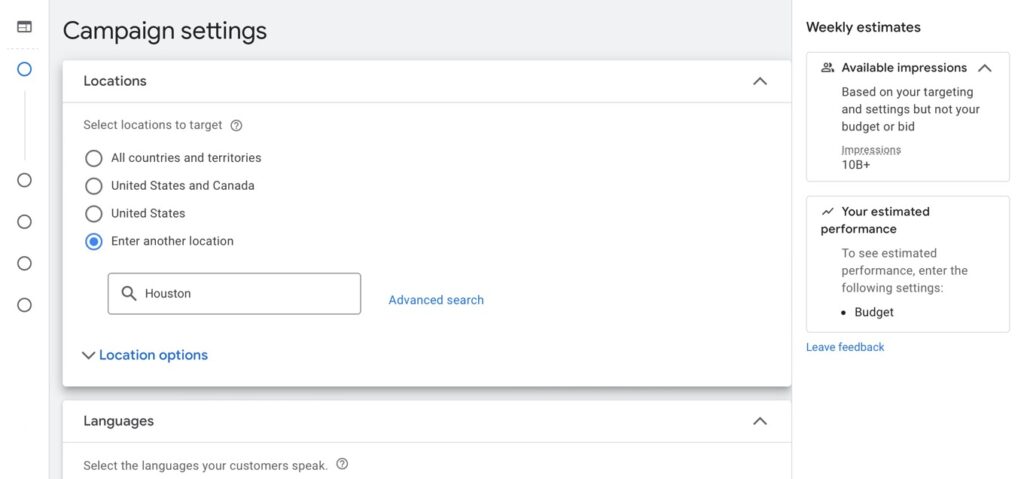
When you start typing the city name, it will popup some additional options to narrow what you mean (such as city, county, state, etc.). If you want to target a major city’s metro area (meaning the city plus the surrounding smaller city), choose the Nielsen DMA for that city. For example, if I chose Houston (the city), my ad would show show only in the city limits of Houston. But if I choose Houston (the DMA), my ad shows throughout the entire Houston area…
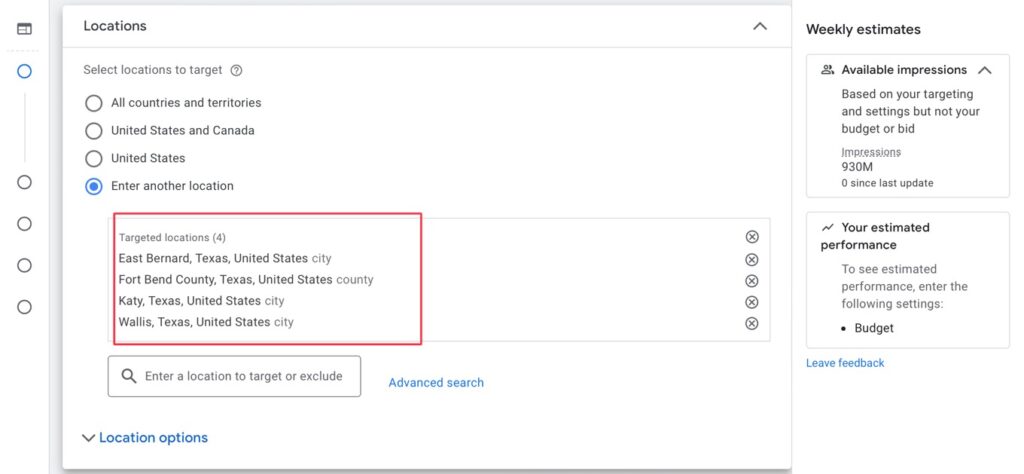
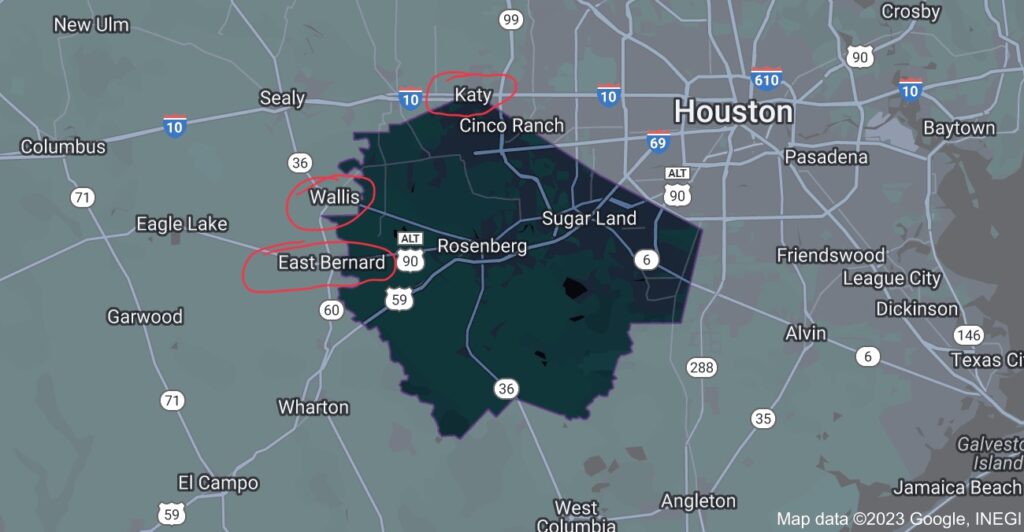
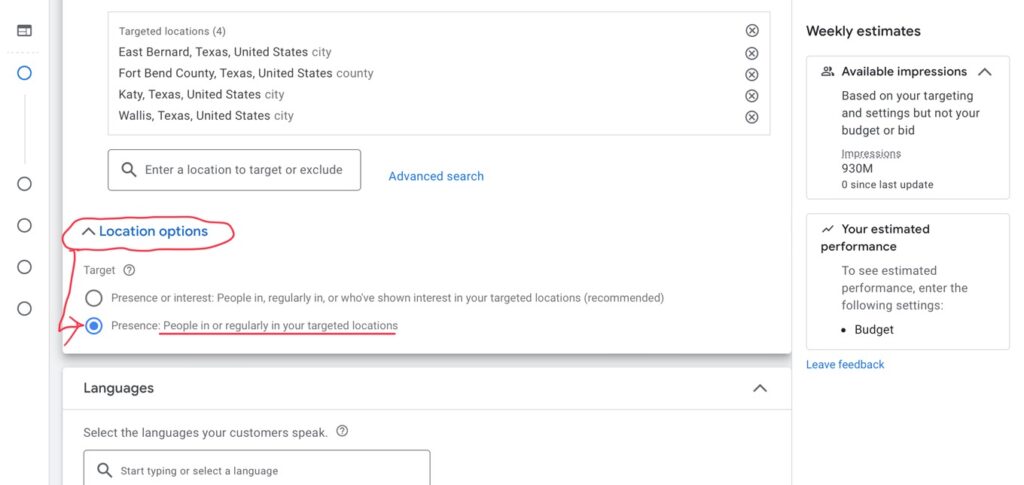
This client happens to be in the southwest corner of the Houston area and they don’t want to drive an hour to the other side of Houston, so for them, I’m going to target just their part of the Houston area. I can do that by targeting their county (Fort Bend) which sits in the southwest corner…
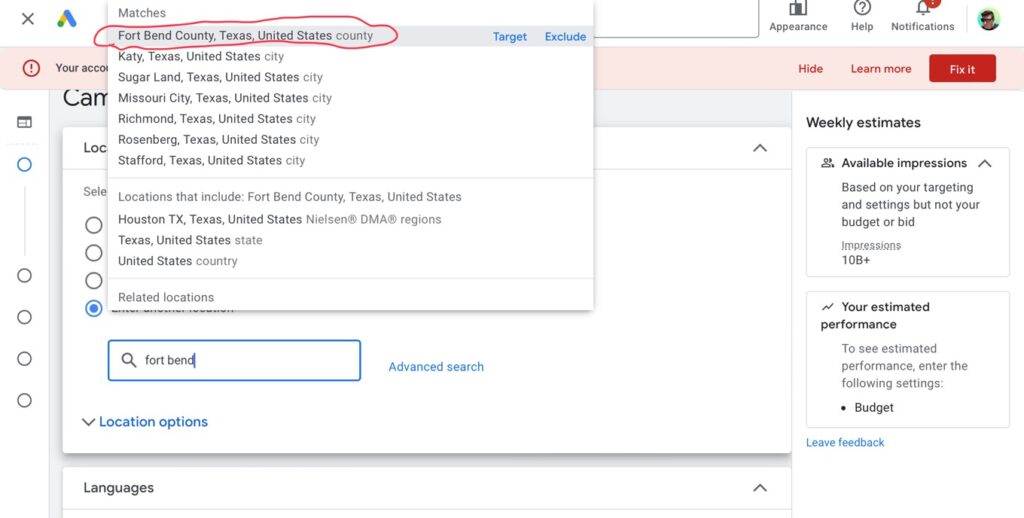
I can also target individual zip codes or add any smaller cities that border the county line but aren’t quite in it…
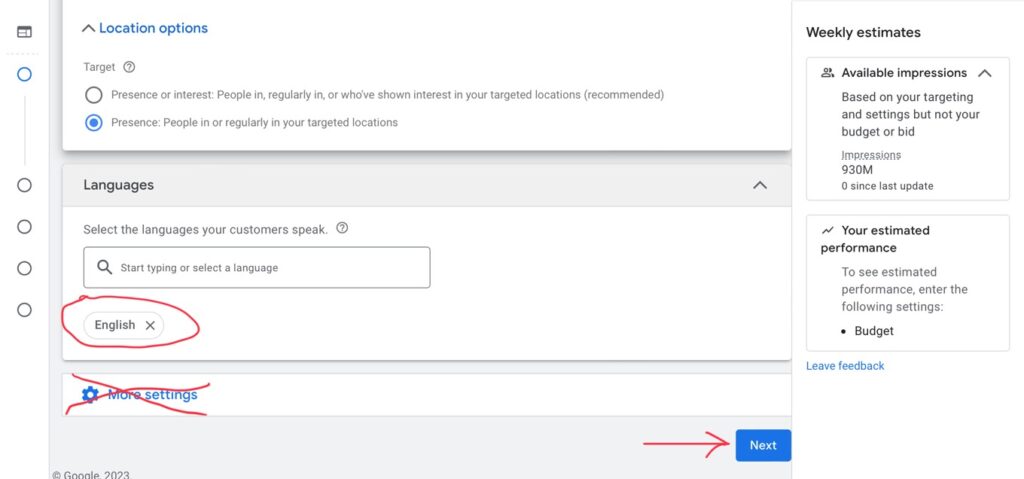
Next, click the “Location options” dropdown and choose “Presence: People in or regularly in your targeted locations”. This will keep you from blowing your budget. If you leave it on the other option, it will show your ads to people outside of your area. That’s not what you want (unless you’re advertising a hotel or something in tourism)…
After that, just leave the language on English (assuming your website is in English and your ad will be in English). Then, leave the “More settings” dropdown alone (those settings are all fine for now). Go ahead and click “Next”!…
We are now in the “Budget and bidding” section. For a local campaign, I start by setting my budget to $5.00 a day. You can also increase it later if need be. But in a lot of local markets, $5 should be fine…
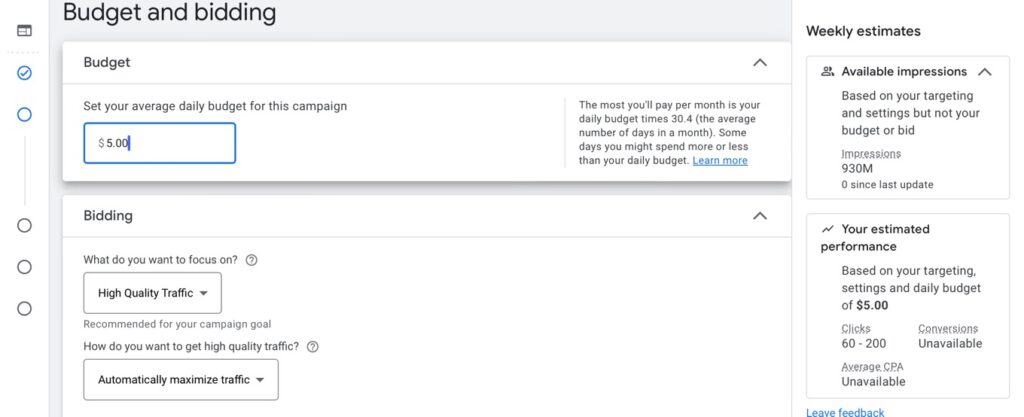
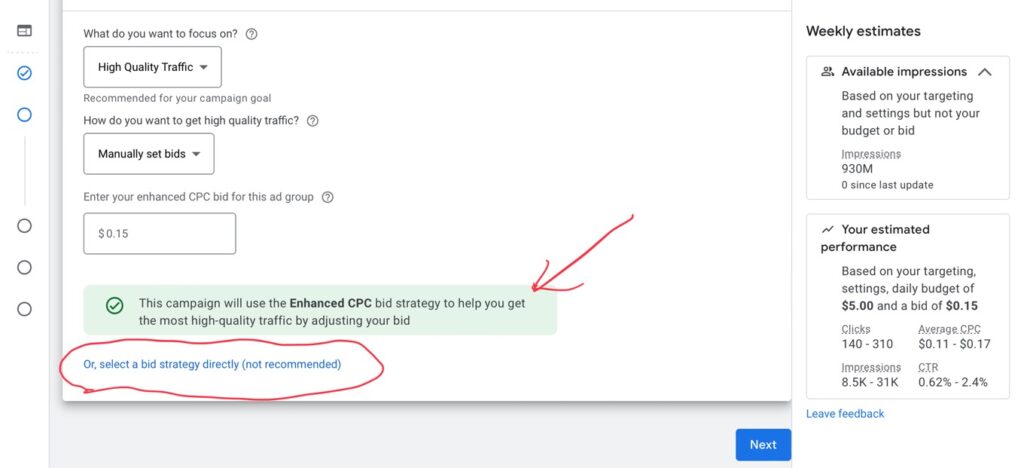
Next, under the “Bidding” heading, we are going to leave the “What do you want to focus on?” on “High Quality Traffic”. The other option will focus on “Viewable impressions”. We don’t want that because it’s better to pay for clicks on the Google Ads platforms (not impressions). So we’ll leave that alone. Then, under “How do you want to get high quality traffic?”, let’s change that to “Manually set bids”. Next, I’ll set how much I want to pay per click. I’m entering $0.15 cents for now. I don’t actually know how much to bid so I’m just putting a low-mid range number for now. I’ll know more once the campaign has been running for awhile…
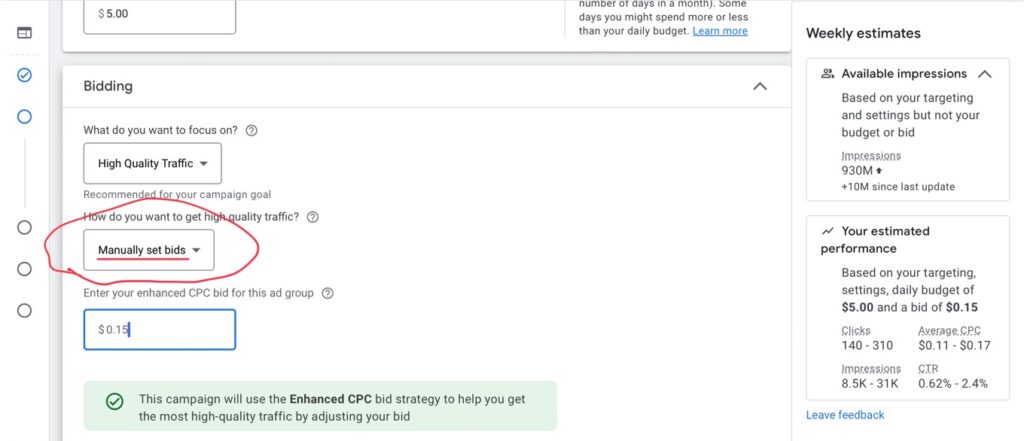
Now, notice the green message saying the campaign will use “Enhanced CPC”. We want to turn that off. Enhanced CPC (or Enhanced Cost-Per-Click) just means Google will automatically increase your bid for you. Which means: they’ll spend your money as they please. So, to have control, I turn that off. To do so, click on the “Or, select a bid strategy directly (not recommend)”. And by the way, of course they don’t recommend it (because it saves you money and keeps them from making more money). Well, you’re the customer at the end of the day. It’s what you want…
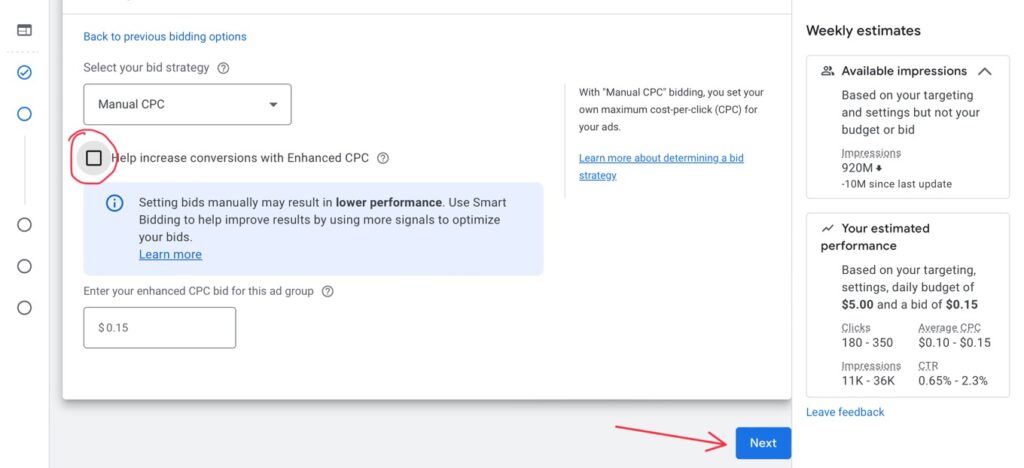
Next, uncheck the “Help increase conversions with Enhanced CPC” checkmark. It will bring up another message trying to convince you to go back to spending more money. Just ignore it and click “Next” to move on…
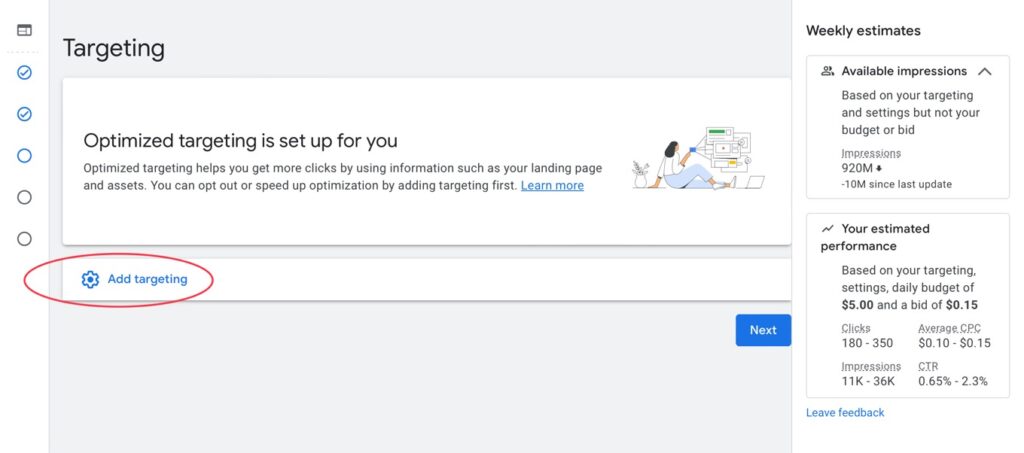
We are now in the “Targeting” section. This section is key because this is where we (of course) target the right audience for our business. Click on “Add targeting”…
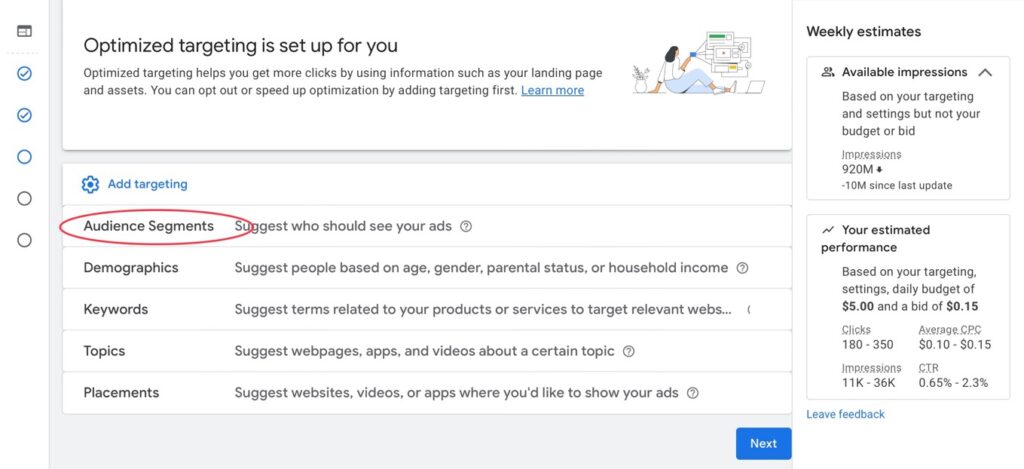
Now, Google provides a lot of ways to target your audience:
- Audience segments allows you to target people that Google already knows about and what kinds of things they’re interest in or searching for online (i.e. in the market for).
- Demographics allows you to target people based on their age, gender, income level and things like that. So if you have that data, it’s a good one to add in addition to another targeting method.
- Keywords allows you to target websites that show your ad based on what’s written on the pages.
- Topics allows you to reach people based on topics their interested in or actively researching.
- Placements allows you to target the actual, individual websites you want to have show your ad.
For my client, they are an HVAC contractor so I’m going to use the “Audience segments” method of targeting. Google already has data on users who are engaging with HVAC sites and responding to HVAC ads. So I’ll just use that. Now, it may not be as narrow as some of the other methods but this is advertising after all- we do want it to be somewhat broad because this concept is about branding too (getting the word out to loads of people). Later on, as people visit my client’s site, the remarketing will take over and narrow the visitors down…
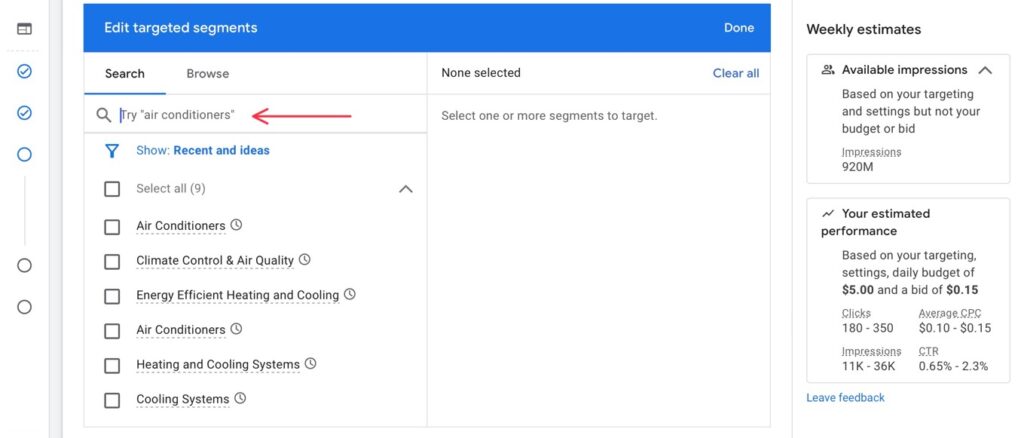
After clicking on “Audience Segments” and it opens, it will automatically show a bunch of air conditioning-related targeting segments that I can select if I want. It knows that the site has to do with HVAC because I entered the URL earlier. But, I can do something better than these options. I’m gonna use the little search bar and type “HVAC service” (that’s a little more descriptive of what the company is)…
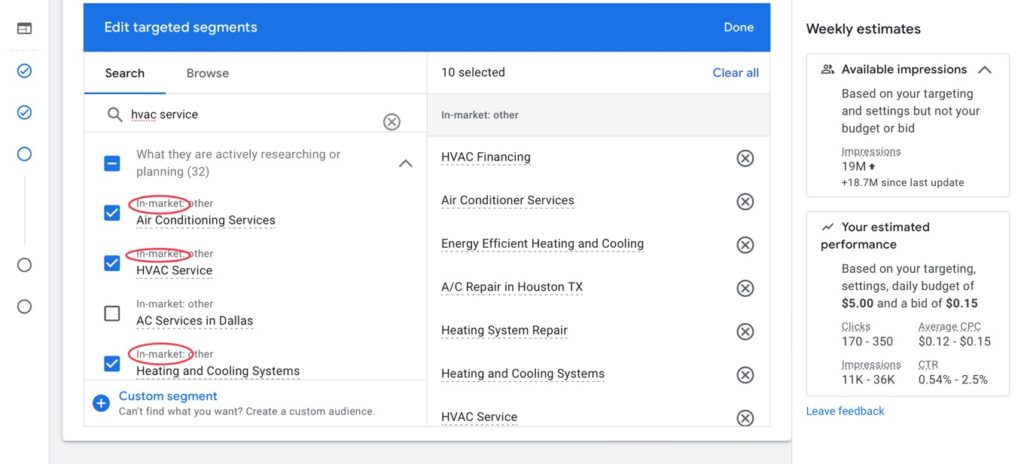
Now notice that the results have choices that say “In-market”. These are better audience segments to choose because these people are actively researching and in the market for “Air Conditioning Services”, “HVAC Service”, “Heating and Cooling Systems”, etc. Be aware that some segments may say “Affinity” above them instead of “In-market”. Affinity audiences aren’t as good because that means the audience has an interest in HVAC themselves. They might be do-it-yourselfers or people learning to be HVAC techs. So by using “In-market”, you target actual shoppers of the service…
Next, you’ll want to uncheck the “Use optimized targeting” checkmark. That’s another ploy to get you to relinquish control and let them overspend your money. Now, if you have some demographics you’d like to add to your targeting like your product is only for people of a certain age, only for a certain gender, only for parents, or only for higher income levels, go ahead and add them by clicking on “Demographics”. Then just click “Next”!…

And we finally made it to ad creation! The ad is going to be responsive. That means, the ad will automatically show in just the right screen size for whatever type of screen, website, app, or device the user is using. So the system will automatically create lots of different versions of your ad and display it accordingly. It’s better than designing your own ad offline and uploading it. You’d have to make hundreds or thousands of different variations of your ad in order to accommodate all the possibilities these days. So just use the responsive ad creation system that comes up automatically anyway.
It will automatically have your landing URL already entered. Just add your business name if it’s not already there…
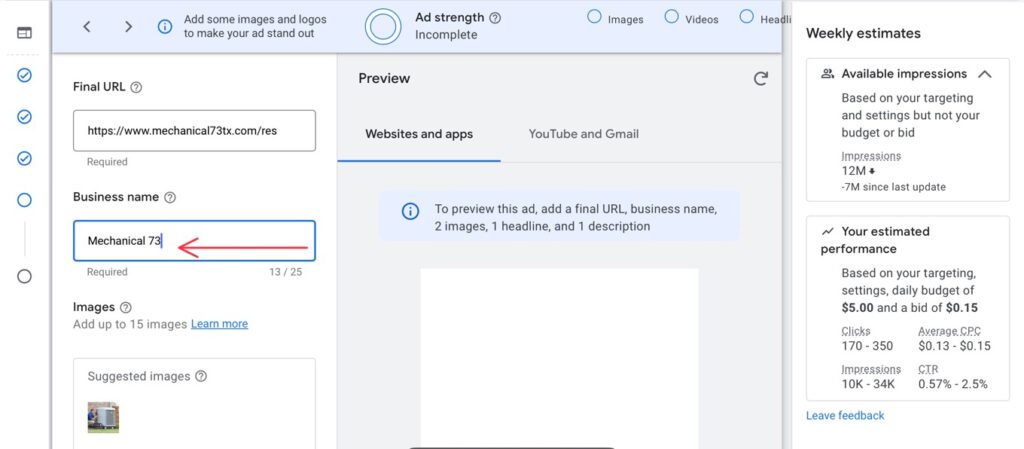
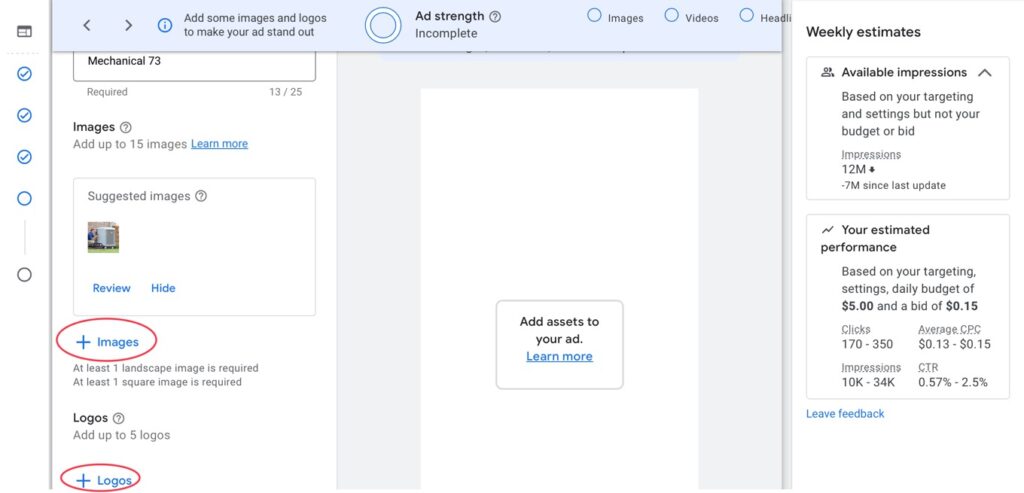
Since the system scanned my client’s website, it found one photo to use. But I still need to add more images. I need to add logos (both as a square and a rectangle) and probably another photo as another size. So I’ll click on “+ Images” and “+ Logos”…
After your images and logos are uploaded and selected, it’s time to write your ad copy. Start with your short headline. The “short headline” is your main headline that’s usually the most bold. It’s important to make this some kind of incentive or special (a promotion). Then write a lengthier version as your long headline. The long headline doesn’t show as many times as the short headline, so I’d keep that in mind. Next write a description. This can be additional sales points about your business. Notice how I talked about the company’s age and how they’re 5-star reviewed. Those are both great sales points. Also notice how I wrote everything in title case. That’s an advertising rule-of-thumb. I also used a couple of exclamation points. I forgot that Google actually doesn’t allow that so I’ll have to delete those exclamation marks to get the ad approved…
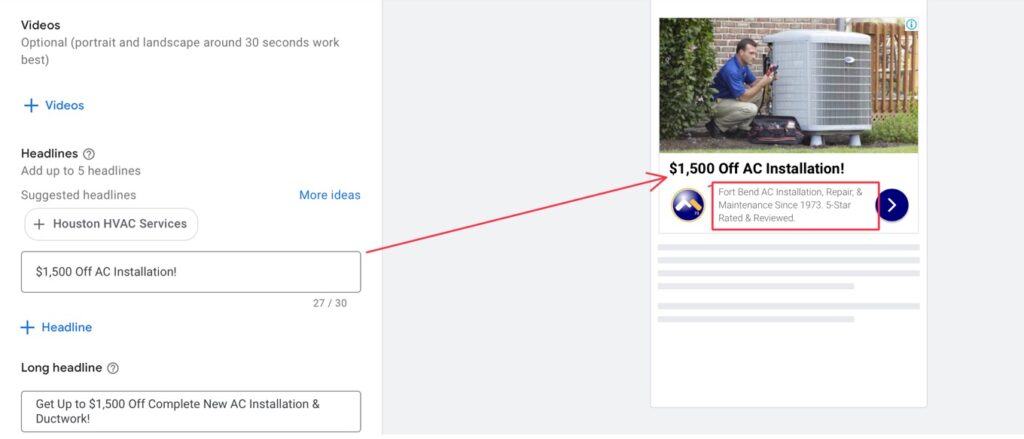
You can also add multiple headlines and descriptions. The system will automatically show the best performing variations and combinations to users.
Then click “Next”, do a final review of everything and click “Publish”. Now it will take up to three days for someone at Google to review your ad and approve it.
Now there is one setting we still need to set and it’s very important. Sorry, I may have brushed by it somewhere during the campaign setting (probably that “More setting” thing I said not to worry about). No fear though, we go can change any settings at any time. So let’s go to the campaign (under “Campaigns”) and click on the wheel icon next to the campaign name…
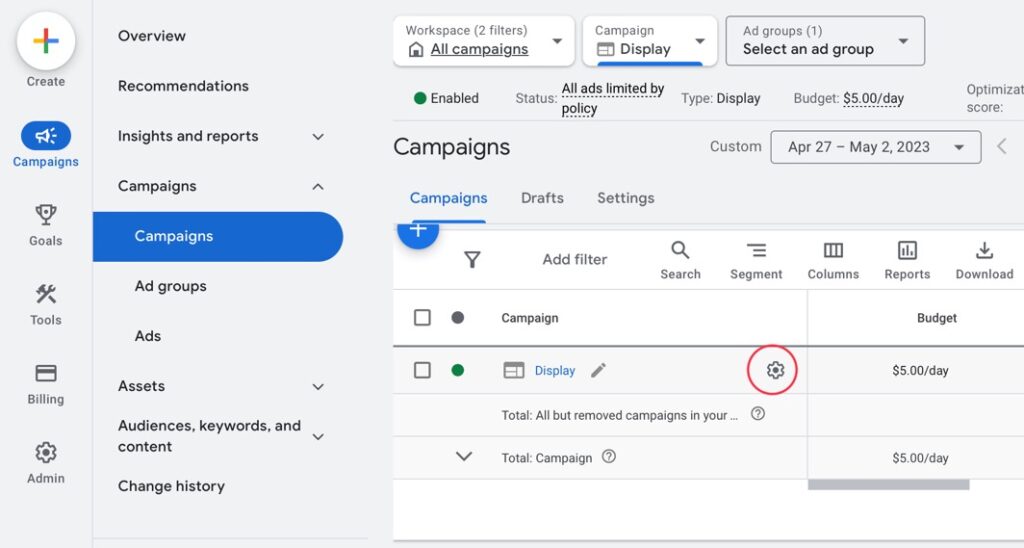
When the Settings overlay comes up, click on “Additional settings” towards the bottom…
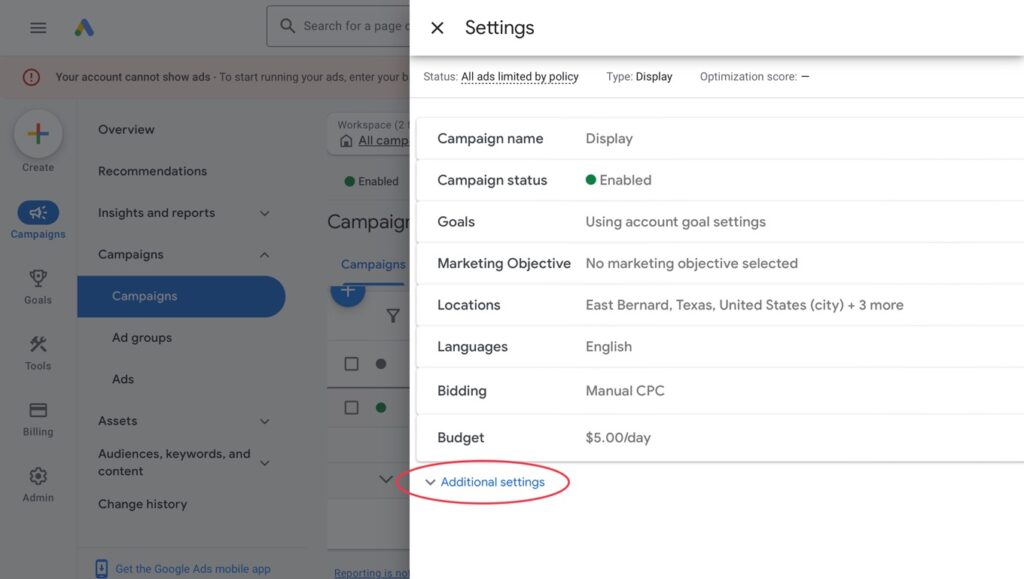
Then click on “Frequency Management”…

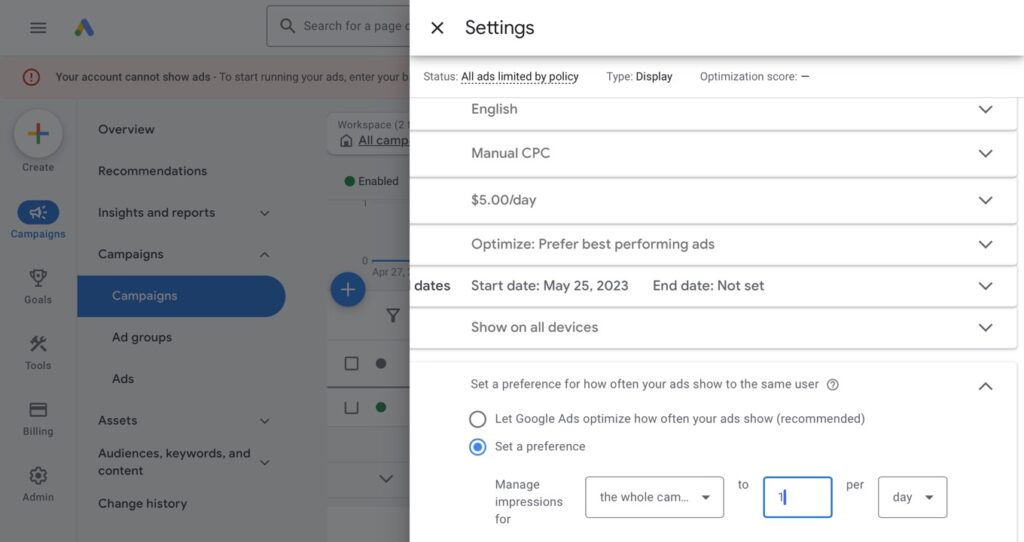
Now change the setting from “Let Google Ads optimize how often your ads show” to “Set a preference”. If you leave it at the recommended setting, Google’s algorithm will go crazy with showing your ad way too much to one person. And that will only annoy people and blow your budget. So I would set a preference and then have it show only once to three times a day to the same person. I like only one time a day best. It annoys people the least and saves me money. Then click “Save”…
As I mentioned toward the start of this lesson, YouTube is other platform I recommend advertising on locally. It is also done inside of Google Ads. My next lesson is on that…